

Composition in Photography
Have you ever typed in the words photography and composition together in Google? If you have you know the first thing that surfaces on any website is the Rule of Thirds.
To be clear this post is not just about a few well-known composition rules. I would like to introduce a more thoughtful approach to composition in photography.
I want to go beyond rules and talk about principles of composition in photography and intentional choices. Along the way, I want to give you some practical building blocks and photo composition examples to improve your composition skills.
Because I believe composition is a series of conscious choices based on a set of underlying principles. And not so much about applying some well-known rules of photographic composition.
The problem with rules is that they’re constraining. And for every so-called photography composition rule, I can show you a photo that’s breaking all of them and makes an impact or tells a story nonetheless.
What is Composition in Photography?
Composition is how you arrange all the elements in the outside world in your frame to make an interesting and appealing photograph.
Photo composition is a very powerful tool. And the good news is you can improve your composition without even understanding anything about your camera.
Of course, it helps when you know how to shoot in manual mode for instance.
But having some composition guidelines will improve your photographs immediately without it.
You can apply composition techniques with your point and shoot, your phone or with a DSLR.
What is the Purpose of Composition in Photography?
The main purpose of the composition of a photo is to tell your viewers what the image is about. It’s to make your subject clear to the people you’re sharing them with.
A carefully crafted composition will draw the viewer’s eye into the photo leading her or him through the photo.
It’s to attract. That’s what it needs to do on the receiver’s end. On the maker’s side, your side, composition is one of the tools in photography you can use to express yourself.
The World is Flat!
Understanding how the camera ‘sees’ and records the outside world is very important in composition.
The moment you press the shutter you transform a three-dimensional world onto a two-dimensional image.
The camera flattens the world. When you truly understand this vital trait of cameras you know why composition is so important.
If you want to know more about this read Do You Think We See The Same?
When the camera transforms from 3 to 2 dimensions the world changes to lines and tones. That’s what a photo is. Lines and tones.
It’s a misconception in photography that a photo is reality or even a representation of reality. It’s not. It’s a photo and as such it’s a new reality.
Understanding this might very well be the biggest AHA-moment in your photography journey. I know it was for me.
And composition is a major component in how to make that new reality meaningful, attractive and compelling.
So let’s get you started!
#1 Including & Excluding Elements
Composing a photograph is a lot about including and excluding elements.
If it’s in the frame it has meaning and purpose. Everything. Even the stuff you didn’t intentionally place inside the frame.
If it’s not meant to be there it will be a distraction and dilute the story you want to tell. So you will have to find ways to make sure it’s not in the frame or isn’t a distraction.
Building Block: Orientation
The orientation of your frame determines whether you arrange the elements in a vertical or horizontal order. This first choice you make when you bring the camera to your eye is an important one.
By changing the orientation of your frame you can decide to include or exclude certain elements.
A horizontal or a vertical frame also has an impact on how the viewer takes in the photo and perceives the story in the frame.
Generally speaking, horizontal orientation is more connecting to the viewer. This is because we have a horizontal view ourselves. Horizontal photographs feel more personal and dynamic. We feel more connected because it feels like we’re right there in the midst of things. It invigorates a sense of immersion and space.
A vertical frame, on the other hand, can feel more detached, static, formal, and constrained.
The decision you make will determine the way the viewer ‘reads’ the image, vertically or horizontally. And in the end, it’s about discovering the flow in your scene and how to emphasize or exaggerate that through a vertical or horizontal orientation of your frame.
How to do it
Look through the viewfinder and take a good look. Change from horizontal to vertical and make some shots in both orientations. What do you see? Do you see a difference? How does it make you feel? What’s happening above and below the subject in a vertical orientation. What’s happening on either side of the subject in a horizontal orientation? What do you think works best for this photo?

To emphasize the vastness of the river I choose a horizontal orientation.

Shooting down from a high point of view gives an interesting perspective.
Building Block: Point of View
The thing you use to compose your shots is not so much the camera but your body. Of course, the camera is vital but it’s an extension of your body. It’s the body that makes the composition.
By taking a step to the left you get rid of that distracting element in the background. When you crouch down you make your subject look taller. Walking towards your subject will fill the frame with what you feel is most important. By taking a step back you show the viewer the background elements. And by climbing on top of a rock you show the viewer an interesting perspective.
Do you see how everything you do to compose your shots comes from where you position your body? By moving your body and your point of view you change the relations between the elements in the frame.
How to do it
Be active, walk around, crouch down, climb up, take a step back or come close. Connect to your subject. Take a good look and ask yourself what do I need to include and exclude to tell the story of this scene?
#2 Pay Attention to the Background
This is one of the most overlooked aspects of beginning photographers. I guess it’s because you’re so focused on the subject that you forget to check what’s behind it.
But because the camera flattens your 3-dimensional scene in the image the background becomes as important as your subject. When the background is cluttered and messy it becomes a huge distraction.
Building Block: High or Low Point of View
As we saw in the first principle one of the major building blocks is your point of view created by the position of your body.
When your background is distracting choosing a high or a low standpoint will eliminate a lot of those distractions.
How to do it
If you have a scene with a distracting background climb on top of something and shoot down. Or kneel down to shoot upward from a low point of view.
Look through the viewfinder to determine how much of the background you need to cut. And consider the new background created by this new point of view. Is it making things better? Try different heights. Maybe just standing on your toes or slightly bending your knees will do the trick.

Shooting up from a low point of view makes the grapevine stand out against the sky.

By filling the frame the distracting elements in the background are eliminated.
Building Block: Fill the Frame
Another solution is to physically come closer to your subject. By closing in you automatically eliminate the distracting background.
How to do it
This is one of the reasons it’s so important to connect with your subject so you don’t feel awkward or shy to become a part of the scene you’re photographing.
Of course, I can see this is not so difficult when your subject is made of bricks. It is, however, a little more challenging when your subject has a beating heart. But please don’t let that stop you. Most human beings are quite nice and when you respectfully approach them a lot of them will be happy to let you come close.
#3 Introduce Depth
A 2-dimensional image doesn’t have depth in itself. You have to put it in there. Remember, it’s an image made up of lines and tones! It’s completely flat. No depth whatsoever.
Building Block: Leading Lines
Converging lines are great for creating depth. It’s the perspective thing at work. In photography, we call them leading lines because they draw the viewer’s eye into the frame. Converging lines have a vanishing point and that’s how they create the illusion of depth.
How to do it
A leading line can be anything but it has to have a direction. It’s not a horizontal or vertical line. They move from the front to the ‘back’ of the image.
You can find leading lines in roads, rails, buildings, streets, etc.
Elements with a repeating vertical pattern can become a leading line as long as the combined vertical lines lead to a vanishing point. Think of a line of trees, or pillars.
It can also be a surface that goes from out-of-focus to in-focus like a wall.
Pay close attention to the lines in your frame. Will taking a step to the left or right enhance the perspective? Lowering or raising your point of view can accentuate the converging lines as well.
Here you’ll discover more ideas to create photos with depth!

Together the vertical lines of the sticks in the ground form leading lines that point to the man working in the vineyard.

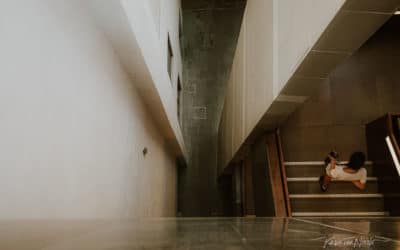
The walls on both sides of the girls sitting outside create depth. The floor adds to this effect.
Building Block: Framing
With framing, you place your subject within a natural ‘frame’, a structure that surrounds or partly blocks the subject. Because the subject is in the background and the ‘frame’ in the foreground you instantly add depth to your photos.
How to do it
The world is full of opportunities to create a frame within a frame. The most obvious one is, of course, a window. But you can use anything that’s in front of the subject but not completely blocking the subject like curtains, pillars, fences, walls, or humans.
#4 Create Dynamic Balance
The word dynamic is important because if it was just about balance it would be perfectly okay to place your subject in the middle of the frame. Truth be told that works sometimes but it’s a little limited and I set out to expand your toolbox today.
Dynamic balance is about the importance of the different elements in the frame and the relation between them. The purpose of dynamic balance is to create tension between elements of different importance.
Ideally, the element that pulls the viewer in is the subject. This is the most important element in your frame. And because of that, it has more visual weight than the rest of the frame. To create tension you give it less actual space than the surrounding elements while making sure it’s clear what your subject is.
Building Block: Negative Space
Negative space refers to areas in the photo where there’s not much going on. Sometimes even nothing. It can be the background or the foreground, but the main idea is that it’s a homogenous space containing similar elements. There are no distracting elements, and nothing stands out.
How to do it
Be on the lookout for similar-looking and homogenous backgrounds to place your subject in front of. It can be the sky, a wall, treelines, fields, streets, etc.
To create dynamic balance using negative space the ’empty’ space must be larger than the subject. Because the ‘empty’ space works as a counterbalance. This makes it more interesting and instantly appealing.
Click here to discover more about Negative Space Photography.

The water surrounding the 2 rocks is quiet and homogenous creating the negative space.

The most important aspect of this photo is the sleeping girl. Placing her in the top right corner creates the dynamic balance of the Rule of Thirds.
Building Block: Rule of Thirds
In the rule of thirds, the frame is divided by four lines into nine equal areas creating a three by three grid. Placing your main subject at the intersection or along one of the lines results in a balanced and at the same time dynamic composition. It allows the viewer to easily engage with the image because our eyes are naturally attracted to the four intersection points.
How to do it
Whenever you notice yourself automatically placing your subject in the middle of the frame stop and think about why you’re doing that. Then start to play around and place your main element in any of the outer areas instead of the middle area.
Activate the three-by-three grid in your camera and keep an eye on it when you’re composing a shot. Place your subject on one of the intersections or along one of the lines.
For landscape photography, placing the horizon on one third of the frame creates tension. In portrait photography placing the eyes on one third from the top or at one of the intersection points is a great way to attract attention to the eyes.
Final Thoughts
These are only a few of the principles and building blocks in composing photos. But they are among the more powerful compositional techniques we have in photography.
The most important aspect is to be aware of all the elements in your frame and how you can emphasize or downplay them. Because if it’s in the frame it has meaning. The vital tool you work with is your body and your point of view. This is your instrument. So, be attentive, be intentional and most of all be active!
Tell us in the comments what your favorite building block is!
Did you try one of the tips? Share your photos on Instagram and mention @photography_playground!


A very helpful tutorial! Each section was clearly presented –with GREAT images! I want to keep those images in mind so I can be more AWARE when composing a shot.
Thanks, Karin!
Hi Lynn, I’m so glad to hear it’s helpful to you. Thank you!
Very well written, well explained, and a very inspirational article.
Thank you
Hi Hussain, thank you! Glad you liked it 🙂
You have such an approachable way of teaching that makes it understandable without feeling like work! Thank you for another amazing article!
Thank you Lauren! That’s so great to hear 🙂
Hey Karin, as usual – very well structured article full of great tips and very fine images used as examples!
Hey Dali, Thank you!