
Low Light Photography
Years ago when I bought my first digital camera there was one thing that absolutely blew me away. My jaw dropped to the floor when the guy from the store told me I could adjust the ISO per shot. For a photographer coming from the time when you had to determine the ISO for a whole roll of film, this was a huge thing.
Let me explain, before we had specific films with specific light sensitivity. So, if I suddenly found myself in a low light situation and the film in my camera was 200 ISO I had a problem. I would not be able to photograph in these low light conditions unless I would switch films which was a hassle and a waste of money.
Digital cameras have fundamentally changed and widened the possibilities of shooting in low light. Sometimes it’s a good thing to acknowledge that.
What is Low Light Photography?
Any camera, from a smartphone camera to the best DSLR, performs best when there’s a lot of light available. But with the arrival of digital cameras, the opportunities in low light digital photography have expanded a lot.
Go here for Night Photography Tips!
Don’t you just love dark and moody street photography or landscape photography during sunset or portrait photography where the face is illuminated by warm candle light? It makes you wanna know how to photograph in the dark, doesn’t it?
But low light photography with a DSLR comes with its own set of challenges. Like what are the best camera settings for low light? What’s the best camera or lens for low light photography? How to get sharp photos when it’s dark?
We’re gonna cover all these challenges but let’s start with the different types of low light situations.
Types of Low Light
Daylight
During the day you might encounter challenging lighting conditions when you’re in large shadowy areas created by buildings or trees. Also if the weather is bad and the sky is full of clouds you might have to adjust your shot to the low light situation.
Inside Light
When you’re inside a building like a museum or a church or a house the light will not shine abundantly.
Night Light
And finally, the obvious low light situations that occur during the early evening and the night. This includes sunset photography and shooting during the golden hour.
If you love shooting sunsets check out these sunset photography tips.
So you wanna know the essential photography tips for making low light photographs without using a flash or a tripod?
Stay with me and I’ll walk you through the whole process!

#1 Shoot in Raw
Shooting in a raw is a no-brainer and not just for low light photography. You should be shooting in Raw all the time. The quality of a Raw file is superior to a JPEG file in every aspect. And that’s what we need when we’re photographing in low light conditions.
A raw file will give you more room to adjust your shot in post-processing. The three areas the raw file can make all the difference when it comes to low light photography are exposure, white balance, and last but not least noise reduction.
- When you’re post-processing in Lightroom or Photoshop you can recover a lot of information in the dark areas. It’s possible to add a few stops to the exposure of a Raw image.
- Raw is also the best setting if you need to adjust the white balance which will definitely happen especially when you’re shooting in artificial light.
- Noise reduction in Lightroom has come a long way. And when you’re shooting in raw it’s possible to reduce the noise in your images big time.
Check out this post about raw vs jpeg to get more info about shooting in raw.
#2 Select a High ISO
So what am I talking about? The ISO is one of the 3 pillars of exposure. It determines the light sensibility of your sensor.
A low ISO indicates the sensor is not very sensitive to light. You should shoot with a low ISO when the light is abundant.
A high ISO indicates the sensor is very sensitive to light and you use it when light is limited.
The downside of a high ISO is the quality of the file becomes less. The higher the ISO the more noise will show up in the file. This is why you want to shoot in Raw so you can reduce the noise while post-processing. You see it’s all intertwined!

#3 Shoot in Manual
Yes, shooting beautiful dark photos is the perfect incentive to move away from Auto! Manual Mode will allow you to set the ISO, shutter speed, and aperture yourself. Low light photography is a typical situation where you need to take control of your camera.
If Manual Mode is not something you feel comfortable with you can set the camera on Shutter Speed Priority Mode. In this Semi-Automatic Mode, you’ll be able to set the shutter speed yourself and the camera will choose the aperture. You can also use Exposure Compensation if that’s necessary.
In low light photography, it’s better to shoot in Shutter Priority Mode instead of Aperture Priority Mode because you don’t want to have a slow shutter speed. This will cause blurriness from camera shake or motion blur when you’re subject is moving.
The slowest shutter speed your camera can handle depends on the focal length of your lens but let’s not get into that now.
It’s safe to say that anything around 1/250 sec is fast enough to get a sharp image. When your lens has image stabilization you can go a little slower.
Need some motivation to move away from Auto Mode? Check out 8 Reasons Why You Need to Shoot in Manual Mode.

#4 Open Up Your Aperture
With the aperture, you determine the size of the opening in the lens through which the light falls. The bigger the opening the more light falls through. In low light photography we need all the light we can gather.
Now aperture is an odd fellow because he does things backward. The bigger the number the smaller the opening. Let me explain.
With an aperture of 11, the opening is very small and lets in very little light. When you use an aperture of let’s say 2.8 the hole is bigger letting in a lot of light. Confusing I know.
Just remember small number = big opening = more light when you’re taking pictures in the dark.
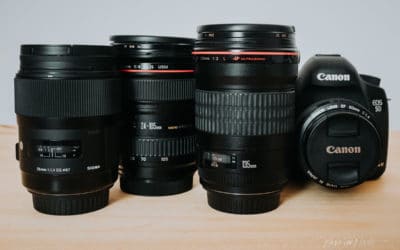
#5 Shoot With a Prime Lens
When you’re photographing in low light situations it’s not so much the camera that makes the difference. Although full-frame cameras perform better in low light conditions simply because they have a bigger sensor it’s the lens that makes the difference.
The best lens for low light pictures is a prime lens, a lens that has a fixed focal length. In general, the quality of prime lenses is better than zoom lenses. And prime lenses usually have a wider aperture. A wide aperture lets in more light which gives you more wiggle room with the ISO and shutter speed setting. We call a lens with a wide aperture a fast lens because it allows you to set a faster shutter speed.
Most kit lenses, for instance, have a maximum aperture of 5.6. When you shoot a lot in low light situations it pays off to invest in a fast lens with a maximum aperture of let’s say 1.4.

#6 Find the Sweet Spot
The trick in low light photography is to find the sweet spot between a high ISO and a slow shutter speed. Let’s see exactly how this works.
As I said before a high ISO setting has a downside to it. It produces noisy and pixelated images. Of course, it’s possible to reduce the noise in post processing but still. You want the best quality file to start with.
That’s why you want to set the ISO as low as possible and as high as necessary. But no higher than that. The shutter speed needs to reflect that. Because it would be a pity if you’re shooting with a shutter speed of 1/1600 sec resulting in a much higher ISO than strictly necessary. Do you see where I’m getting at?
So, if you set the shutter speed at 1/250 and the aperture is wide you have the baseline for your ISO setting.
Program Mode
When you’re starting out in photography this can all be a little overwhelming. I get it! Maybe you’re clinging on to Auto Mode because you don’t wanna mess things up. Manual Mode or Shutter Mode can feel complicated. But there’s a solution for that.
The first step away from Auto Mode is Program Mode! In Program Mode, you’ll be able to turn off your automatic flash, shoot in raw, and set your ISO. You can also set a combination of shutter speed and aperture. As long as you make sure the shutter speed doesn’t go below 1/250 sec you’ll be fine.
And if you’d like more guidance in your first steps away from auto mode, download the Starter Photography Playbook by filling in the form below!


#7 Get Close to the Bright Area
The closer you are to the light the more it will fill your frame.
This will result in more light falling on your sensor so you can ease up on the high ISO and wide aperture. It’s a simple but effective course of action if it’s possible to do.
Of course, I understand there are a lot of situations where it is simply not possible to move closer. Then you’ll have to crank up the ISO.

#8 Test Your Camera’s ISO
You probably think but why not set it on the highest ISO as soon as light conditions go down. If it’s in the camera it’s there to use it. I can see where you’re coming from but it’s not entirely true.
So, for instance, the highest ISO my camera can produce is 25.600. But it does not perform well at this high setting. The amount of noise in the file is very high. Usually, just 1 or 2 stops below the maximum ISO setting will give you much better results. You should test out for yourself how high your camera can go and still produce quality files.
That being said if there’s no way around it and you’re shooting with the widest aperture and the slowest shutter speed you can handle and it’s not enough to get a well-exposed image go ahead and go beyond your cameras comfort zone.
Because in the end, a noisy photo is better than a blurry photo. You can reduce the noise in post. But when an image is blurry there’s no amount of post processing that can fix that.

#9 Mind Your Focus
When it’s very dark the camera has trouble focusing. It doesn’t need a lot but there needs to be some light to focus. When you’re having trouble getting a sharp focus you can look for areas in the scene with a little bit of contrast. An area where light and dark come together.
Usually, it’s easier for the camera to focus with a little bit of contrast.
The most powerful focus point in your frame is the one in the middle. So, the best way to do that is to focus and reframe. Because the area to get the best focus is not necessarily the area you want in the middle of your frame. You focus first and then you adjust the composition while you’re keeping the shutter half-pressed.

#10 Create Your Own Tripod
As I said in step #3 a shutter speed of around 1/250 sec is within the safe zone. However, if you really need to go slower there are a few things you can do to keep that image sharp!
If it’s possible you can position your camera on anything sturdy like a wall or a table to support the camera. When you use the self-timer you’ll be able to get crisp pics using a slow shutter speed.
Another possibility is to pay attention to the way you hold the camera and your body. Both feet on the ground hip-width apart, push your elbows in your sides, breath in, hold your breath and then you push the shutter. Be very aware you only move the button and not the camera. It is the slightest of movement to push the button if you use only your finger.
Using this method you can shoot with shutter speeds as slow as 1/30 sec. And when you practice a lot it might even be slower. I’ve been known to shoot with shutter speeds of 1/3 of a second.
You need to be aware that both methods only influence the movement your camera makes, the camera shake. It will not fix motion blur, or the movement your subjects make.

Conclusion
With these low light photography tips and some practice, you’ll be able to shoot in a lot of low light situations without the use of a flash or a tripod. Shooting in Raw and taking control of your camera settings is very important for low light situations like indoor photography or sunset photography. If manual mode or shutter mode is too far out there, you can start by taking control in program mode.
Do you still have questions about shooting low light pics? Let me know in the comments and I’ll answer them!
Did you try one of the tips? Share your photos on Instagram and mention @photography_playground!


VERY informative. Can’t wait to try alternative low-light (no flash permitted) situations. My Lumix DMC-FZ1000’s “F” range is rather limited: just 2.8 — 8. For me the most light in will be at 2.8. Right? What hand held shutter speed and IS0 should I start practicing with? Thank you.
Hi Gus, happy to help 🙂 Yes, the biggest opening will be at 2.8 and the ISO depends on the circumstances. Take it up as much as you need to be able to select a shutter speed of 1/250 and aperture 2.8. Hope this helps!
Hi Karin. Am off to shoot an indoor Indian festival with dancers so found your article great to refresh technique/setting ideas. Hope I can get my shutter fast enough without flash. Otherwise I’ll be focussing on creative motion blur images! Thank you!
Antoinette
Hi Antoinette, so glad you found it helpful 🙂
Very helpful. Thank you!
You’re welcome 🙂
excellent
Thank you Bob! Glad you liked it.