
Travel Photography for Beginners
Travelling is one of the greater joys in life. The pictures we take during our trips are oftentimes the only tangible memories we have of that unique experience. Knowing just a little more than where the button to push is can make those tangible memories a joy to look at for years to come.
So make sure you read these tips for travel photography for beginners before you start packing for your travels.
Because I’d love you to go beyond just pushing the button. I want you to come home with photos that are as meaningful and wonderful as your trip was.
#1 Prepare Wisely
Whether you’re bringing a bulky DSLR, a lighter mirrorless, or just your smartphone it’s wise to prepare for your trip.
But first things first, if you have a lot of gear, try to limit yourself in the gear you bring on your trip.
It happened to me often that I felt the need to bring everything I have, just in case, but came back after using not even half of the gear I traveled with.
Limiting yourself in the gear you bring can actually be a blessing. Not only because you don’t have to carry it around all day. It will also make you more creative because it encourages you to think out of the box.
The Practical Stuff
Give your camera a good clean-up before you leave. You can get that done in a camera shop or check out this article about DIY camera sensor cleaning.
The next step is to make sure you bring everything you need. That means a memory card and battery. It’s best to bring a spare for both. And don’t forget the battery charger. Check the available space on your memory card and if there are still files on it, upload them to your computer and format the card to start your holiday with a clean slate.
If you have a power bank for your phone, bring it as well. If you take a lot of pictures and edit them on the go your phone battery can get depleted during the day.
Also, check if you need a world plug for your destination. Nothing is more discouraging than not being able to plug in your charger.

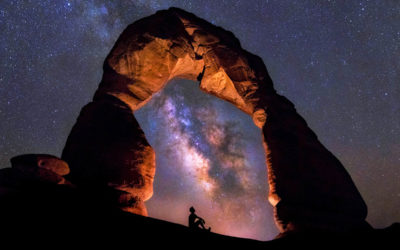
#2 Find the Light
As we all know, light is the most important ingredient of a picture. And natural light is the best. Try to avoid using your flash as it gives harsh light that doesn’t do your subject any favors.
Sunlight is available all day long. But you’ll find the most beautiful sunlight in the morning or afternoon. Morning or afternoon light creates long shadows. And that makes your pictures more interesting because the shadows create depth.
An especially beautiful time of day is the late afternoon during the golden hour. It’s called golden hour because it gives your subject a magical warm glow. It can transform a simple landscape into a mythical place and a plain portrait into a glowing love song.
Wanna dive deep into the light? This blog post is fully dedicated to mastering natural light photography.

#3 Mix It Up
A lot of people just take the first shot that presents itself and be done with it. This results in a stream of pictures taken from more or less the same point of view. The same pictures everybody comes home with.
If you want to take your photography to the next level you need to take a different approach. So how do you do that?
It’s actually quite simple, you make an effort to walk around your subject. To explore different points of view.
You can for instance get really close and photograph a detail.
Or you get down on your knees and photograph from an unusual angle.
Or take a step back and shoot a panoramic scene.
Mixing it up can make your pictures look instantly better and more interesting.
It’s worth your effort and time to go a little deeper than those first impressions.
Be curious and look for something different!

#4 Get into Composition
It’s amazing to see how little tweaks in composition can turn a mediocre picture into a great one.
It’s all about paying attention to how you arrange everything in your frame.
For instance, placing the horizon in the middle of the picture can be a little boring. But when you place the horizon at one-third of the picture it immediately becomes more interesting. This is one of the best-known composition tools, the rule of thirds.
Rule of Thirds
According to the rule of thirds, the frame is divided by four lines, two horizontal and two vertical. The intersection points of those four lines attract attention as well as the lines themselves.
Most cameras, including phone cameras, have the option of activating this three-by-three grid in the viewfinder or on the screen. It makes it even easier to compose your pictures with the rule of thirds in mind.
Symmetry
Another very important composition tool is symmetry. Symmetry is very pleasing to the eye. If you come across a natural symmetrical subject pay attention to those symmetrical elements and make sure your composition is as symmetrical as possible.
Want more composition tips? Check out this post about composition in photography.

#5 Make Connections
When you’re on holiday it’s great to take pictures of an amazing landscape or a remarkable building. But have you ever considered that photographing the people that actually live there can be very rewarding?
This might feel a little scary to you and I get it. Because you never know how someone is going to react to your camera.
That’s why it’s important to be respectful and ask for permission. This doesn’t need to be a full-on conversation.
Quite often smiling and pointing at your camera will break the ice and you can take it from there.
Some people will decline. That’s okay, just keep smiling and walk away. Although officially you are allowed in a lot of countries to photograph people in public places that doesn’t mean you should enforce that right.
But it can also happen that this little gesture will be the start of a conversation and a little photoshoot. Good for you!
The main thing is to make a connection and to be respectful. Customs differ across the globe. What is normal to you might not be for someone in another part of the world. Be aware of that difference. You can ask your travel agent or your host what the local customs are considering photographing people in public places.
If you like to photograph people check out more street photography ideas here.
Did you try one of the tips? Share your photos on Instagram and mention @photography-playground!


Nov 2023, a Bucket List trip to Norway, above the Arctic Circle as far as Kirkeness on a Hurtigruten ship, the Kang Harald TO SEE AND PHOTOGRAPH THE “NORTHERN LIGHTS” WITH (Panasonic) Lumix DMC-FZ1000 and our cell phones. Any advice as to settings, aspect ratio, and choice of intelligent auto, Handheld Night Shot, Clear Night Portrait, Romantic Sunset Glow, Vivid Sunset Glow. Admission, I’ve never had success shooting in “P” Aperture, Shutter, or Manual modes. But I will practice if you suggest a “try xyz mode” using the following settings. FYI, my camera’s F-stop range is limited: 2.8, 4.0, 4.5, 5.0, 5.6, 6.3, 7.1, 8.0.
Hi Gus, yes I would definitely photograph in one of the modes that give more control. There is still plenty of time to practice before you leave! Did you check out the post about Night Photography? I’m sure you’ll find some answers there. I hope you have an amazing trip and come home with wonderful photos!
Your “Five awesome Travel Tips for Beginners” is, quire frankly…awesome. Need help with backlit or shots shooting at full or setting sun. Well done and Thank You.m
Thank you 🙂 Did you check out Sunset Photography Tips?