How to Watermark Photos
Have you ever wondered how to make sure your photos are safe when they’re circulating the web? Afraid to even share your photos because you don’t want them to get ‘stolen’? Well, you’re in for a treat.
This in-depth article walks you through all the steps you need to take to protect your images on the web. Because after all, a photo is meant to be seen and shared, right?
I’m gonna show you how to watermark photos in Lightroom but also how to add layers of protection through copyrighting your images.
Before we dive into how to watermark photos let’s have a closer look at why you might wanna do that.
Protect what is yours
So hold on for a bit because it’s gonna be slightly boring as I share some legal stuff with you. The main reason to watermark and copyright your photos is to protect them from getting shared without your consent or credits.
Since digital photography and the internet, it has become very easy for people to ‘steal’ your photos and pass them off as their own. This takes on various forms of course. Sometimes people are simply not aware they’re doing something that’s not okay.
There are a few steps you can take to make it a little less likely that this is gonna happen. I’m not saying it never will but with the following practices in place, you make it as difficult for them as you can.
What is Copyright?
Let’s first talk a little bit about copyright because there’s a lot of confusion around that topic. But it’s really simple.
You see, the moment you press the shutter the photo you’ve created is legally yours. You don’t have to do anything to obtain that ownership.
It’s yours because you created it. You have the copyright of every single photo you ever produced. Today, in the future, and the past.
And if you’ve made sure your images contain your copyright information you’ll be able to prove the image is yours and take legal steps if you want to.
Different Countries, Different Laws
As I said, you own the copyright the moment you press the shutter.
That’s more or less the same in every country. But the laws differ from country to country when you actually wanna take legal action if someone has stolen your photos.
If you want an airtight system, I advise you to check the way your country has organized itself around copyright infringements.
I’m not a lawyer and therefore not able to give you any legal advice.
What I can do is share a photography workflow where copyright is always upfront and center. So you can do what you can do to protect your precious photos as much as possible.
Copyright And Social Media
There’s even more confusion on copyright when you share your images on social media like Facebook and Instagram. Let me clear that up.
So both Facebook and Instagram clearly state in their terms of service that by posting an image on their platform you do not transfer your copyright.
However, it also clearly states that by posting you agree to let Facebook and Instagram use the photos.
This is how they put it “you grant us a non-exclusive, transferable, sub-licensable, royalty-free, worldwide license”.
So the copyright is still yours but by making use of their platform you give them the license to use photos any way they see fit. Which makes a photography watermark even more important when you share your photos on social media.
In-Camera Copyright
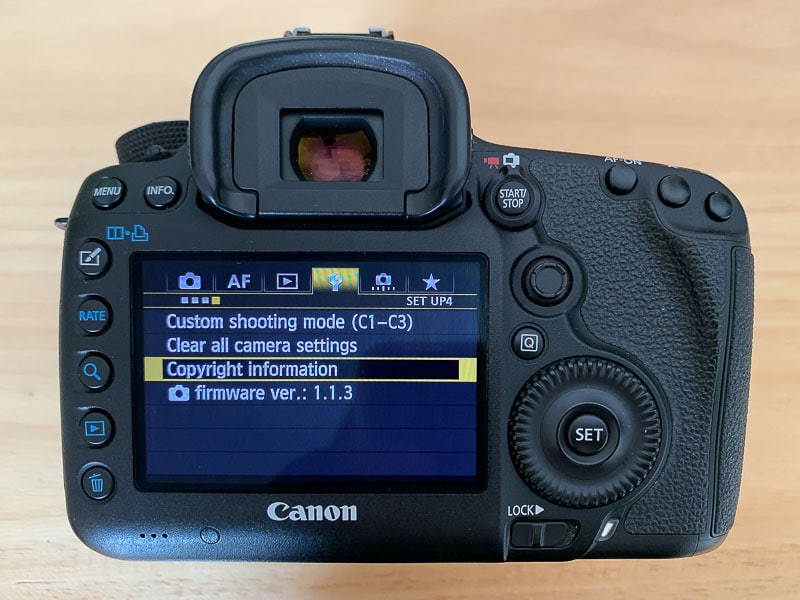
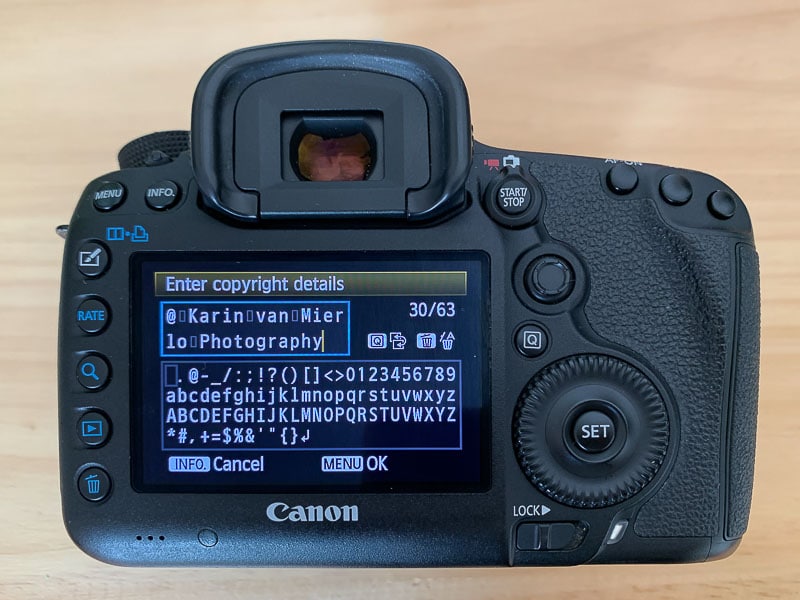
We’ll get to that part soon but first I want you to get your camera and check if you have already filled in the copyright information in your camera menu.
If you haven’t don’t waste another minute and go do that now. This ensures that every photo that leaves your camera will have your copyright details attached to it in the metadata of the file.
This is a no-brainer and is your first protective wall against theft.
During Import
The next layer of protection is to add your copyright information while you’re importing your files into Lightroom.
Because in Lightroom you can also add contact information. This makes it really hard for someone to uphold the claim that they didn’t know the photo was yours and had no way of contacting you to ask for permission.
I’ve written a post on how to import your photos into Lightroom that shows you in detail how to do that.
You can find the post here, How to Navigate the Library Module in Lightroom.

Just remember when you’re exporting your photos to select the Copyright & Contact Information in the Metadata box in the Export window.
Pros and Cons of Watermarking
You might be wondering with all this in place if it’s still necessary to know how to watermark photos. After all, isn’t it a little distracting?
You’re right, there are some pros and cons to watermark photos. The biggest con is of course that it could take away the attention from the photo. But that’s where this guide comes in because I will show you how to watermark your photos in the least distracting way.
Another reason some photographers can’t be bothered to watermark their photos is that they think it has no use. Because it’s easy to crop out a watermark or even get rid of it all together.
Sure, this is a fact. Although erasing a watermark takes quite some effort and skill cropping it out is done in a second.
The thing is you want to make it as difficult as possible to have your photos stolen. It’s just another layer of protection. That’s why it’s important to know how to watermark photos.
A big pro is that with a watermark, a potential photo snatcher is very much aware that he or she is using something that doesn’t belong to him or her. There is literary no way around it, it’s in their face.
Another reason to watermark photos is that you like to ‘sign’ your work. Your photos are easily recognizable especially when you share them on the web. And if you take your photography seriously that’s super important.
Especially on social media platforms like Facebook and Instagram adding a watermark is a way to let people know you are the photographer of that photo with all the likes.
Before we dive into the nitty-gritty of actually creating a watermark in Lightroom just a few simple tips.
How to Watermark Photos Tips
#1 Test Your Watermark
You apply your watermark the moment you export your photos out of Lightroom. So you won’t be able to see your watermark and how it looks until it has actually left Lightroom.
When you’ve made your first watermark you should test it out on just one file before you bulk export tons of photos. So you don’t have to do it all over again when you discover your watermark is just not exactly right.
#2 Size
The size of your watermark is very important.
It shouldn’t be too big because that will be way too distracting.
But it also shouldn’t be too small. Because what’s the point if no one can read your watermark.
#3 Position
Give some thought to the position of your watermark. Usually, it’s in one of the lower corners.
The only time I place a watermark right in the middle and for the full length of the file is when I send files for approval to a client.
#4 Opacity
The best way to keep distraction to a minimum is by lowering the opacity of your watermark.
This way the watermark blends in nicely with your photo while maintaining its presence.
#5 Access
You can access the Watermark Editor from within Lightroom by clicking Lightroom in your menu and then selecting Edit Watermarks…
Another approach is to access it via the Export Menu. Click on Export, scroll down to Watermarking, and open the drop-down menu. When you select Edit Watermarks… all the way at the bottom you’ll arrive in the Watermark Editor.
#6 Diversify
You can create a lot of different watermarks for different situations. For instance, you can have a white and a black version. Or the same watermark but one in the left corner and the other in the right corner.
#7 Styles
There are two styles to apply a watermark in Lightroom. Through text and a graphic. A graphic can be your logo or a custom-made signature. I’ll walk you through both methods.
Looking for a way to set this up, but you don’t have Lightroom? Check out PhotoMarks!

Text Style Watermark
We’re gonna start with the text-style watermark. This is the most simple style watermark and anyone can do this.
Step 1 Select Text Option
Start by accessing the watermark menu described in tip 5 above and select the Text option.
You can see your photo and a textbox beneath. You can write whatever you want but I suggest the copyright symbol followed by your name.

If you’re on a Mac the shortcut for the copyright symbol is Option+g. The most common way for a Windows is Alt+0169.
Step 2 Select the Style
Now you’re going to select a font. Take a little time to choose a font you like. It’s just too easy to leave it at the default setting. Make an effort to find a font that fits your style!
You can select the style, alignment, and color here as well. You can play around with shadow if you like but I always disable this. For me, it just adds a layer of distraction.
If you have a bright photo and your white text is not showing why not create a second watermark in black.
Step 3 Effects
In Watermark Effects, you can determine the look and position of your text.

- First, Opacity, I suggest you set it around 50% but play around with this.
- Then check the Proportional box and set a reasonable size. Not too big but not too small either.
- We’re gonna skip Inset for just a sec and move to Anchor first. This little box shows you the 9 positions where you can place your text. The lower left or right corners are the most common. Just click in one of the circles.
- Now we go back to Inset which allows you to make micro changes to the position of your text. Make sure there is a little space between the edges of the image and your text.
Step 4 Save & Name
Okay, your text-style watermark is ready to be applied. But first, click on save and name your watermark. Give it a simple and clear name. When you’re done go to Export, that is if you are not already there, and export one file first to test it out.

Don’t forget to select the Copyright & Contact Info in the Metadata window! This attaches your info to your file but strips away all the other info no one really needs to know.
Now go and Export that image to see how awesome your watermark looks!

Graphic Style Watermark
Signing your photos with a logo or a signature is a great way to protect your images, give them a personal touch, and stand out from the crowd.
Step 1 Select Graphic Option
Access the Watermark Editor as described in tip 5.
At the top, select the Graphic option.
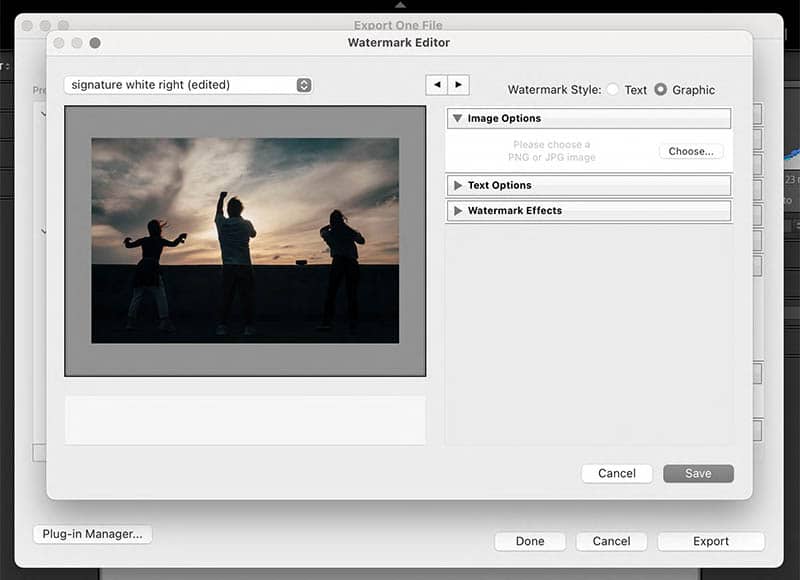
The next step is to open up the Image Options panel and choose your image file and upload it to the Watermark Editor.
Step 2 Watermark Effects
We’re gonna move straight to the Watermarks Effects now.
- Start with setting the Opacity at around 50%.
- Set Size to Proportional and adjust the size of the image with the slider. Again, not too big and not too small.

- Like with the Text Style Watermark you skip Inset for now and go straight to Anchor. Place your image in one of the lower corners.
- Then go back up to set the Inset in such a way the logo or signature is neatly aligned with the edges of the image.
Step 3 Save & Name
Save your watermark and give it a name. How about something like Signature White Right.
That way, when you have created different watermarks you’ll be able to easily find them.
Check the Copyright & Contact Info in the Metadata section before you hit Export!
Congratulations, now you know how to watermark your photos with your own logo or signature.
Watermark Photos in Lightroom Mobile
Not everyone has access to Lightroom Classic so here’s how to watermark photos in Lightroom Mobile.
Step 1: Open a photo in Lightroom Mobile, work your editing magic, and when you’re done select the Share icon in the top right corner.
Step 2: Select Export as…
Step 3: Activate the Include Watermark and select Customize.
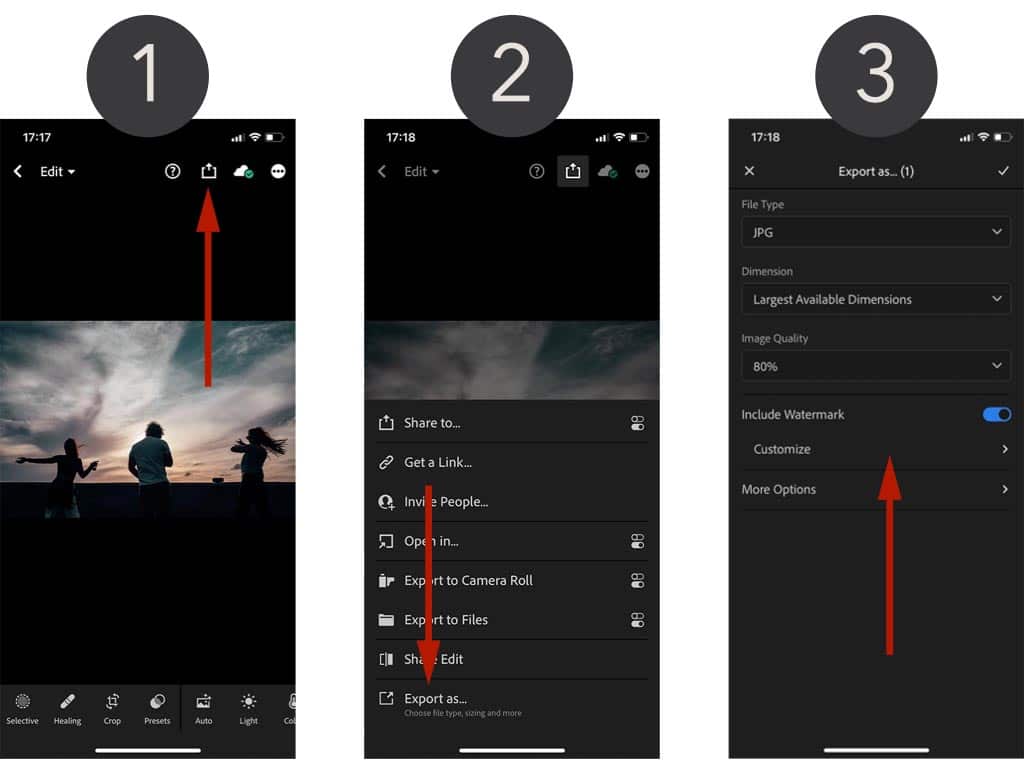
Step 4: Select Graphic and upload your logo or signature.
Step 5: Once your file is uploaded you need to first adjust the size.
After adjusting the size you decide on a position. If you want it on the right side as I did you need to move the Horizontal Offset almost all the way to the right. For a position in the bottom corner, you can leave the Vertical Offset at zero.
As the last step, you reduce the Opacity to around 50%.
Step 6: Go back to the previous window and select the Check Mark icon to export your file.
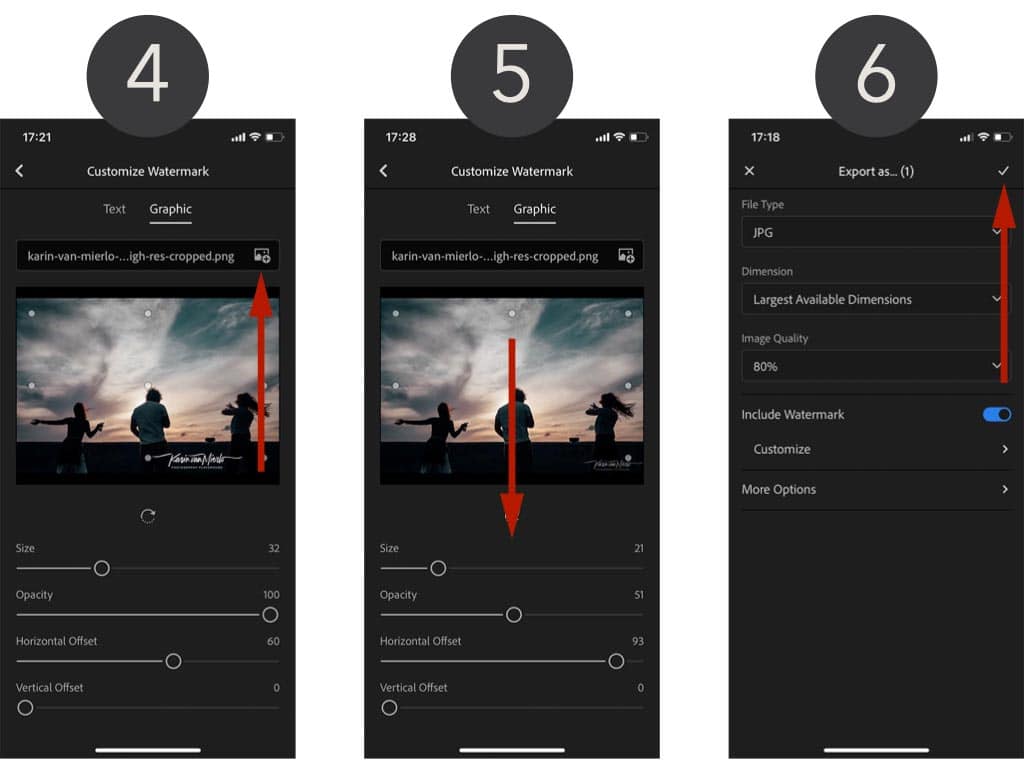
And that’s how you watermark your photos in Lightroom Mobile.
Now every time you export a photo the watermark will be applied. Unless you uncheck Include Watermark of course.
Of course, you can also create a text-style watermark. In that case, you just select the text option.
Watermark Photos in PhotoMarks
Instead of using Lightroom for watermarking your images, PhotoMarks offers a great alternative. This tool allows you to batch watermark your photos with a logo, custom-made signature, or plain text outside of Lightroom or Photoshop. It offers user-friendly functionality and provides a variety of options to suit your preferences.
As you can see in the image below, it looks very similar to the Lightroom Text Watermark.

Final Thoughts
I hope this guide on how to watermark photos is super helpful to you.
With these simple yet effective practices in place, you’ve lowered the chance of your images getting stolen significantly.
And even if it does, you’ll have everything in place to prove the photo is yours.
So take a little time to set this up, and you never have to worry about it again.
Did you try one of the tips? Share your photos on Instagram and mention @photography-playground!




0 Comments