

Library Module in Lightroom
Lightroom fundamentally changed the way I post-process my images. When I started in digital photography there was only Photoshop. And yes I could do great things with my images in Photoshop.
However, Lightroom is the game-changer. It saves me a ton of time, it doesn’t require huge amounts of memory and it runs a tight ship. The Library Module in Lightroom has everything I need for organizing my images. And the Develop module gives me endless possibilities in getting the best out of photos. Lightroom was built specifically with the photographer’s workflow in mind.
Now, I understand that when you’re just starting out in photography you might be wondering if Lightroom is good for beginners and if it’s easy to learn? I can say a firm YES to both questions! It is absolutely worth your time to learn it when you’re starting out. And with this tutorial series, it will be easy as well.
Wanna know how to edit your pics? Go to How to Best Edit Your Travel Photos in Lightroom.
And here’s a post with 25 awesome Lightroom Hacks.
Go here to try out Lightroom for free with a 7-day trial.
Let’s get this show on the road and start with the basic workings of Lightroom.
Source & Preview
Before you can start to edit your files you need to import them into Lightroom. This is fundamentally different from an editing app like Photoshop. Your files sort of live in 2 places. On the hard drive of your computer and inside the Library Module in Lightroom.
The file on your computer (or external drive) is the Source file, the file in Lightroom is the Preview. Preview and Source file need to be connected to sync the adjustments you made.
Still with me?
Okay! What makes Lightroom so awesome is the fact that the adjustments you make are not made in the image itself. We call it non-destructive editing. The Source file stays as it was when it left your memory card. Lightroom does not alter the image itself.
Sidecar
But how does Lightroom do it if the image stays the same? Well, every Source file gets a Sidecar file. This Sidecar file does exactly what its name implies. Think of your Source file as the motorbike and the Sidecar file as …………. yep, the sidecar.
It accompanies your Source file wherever it goes. What’s in the Sidecar file? It contains a written script of all the amazing things you did to the Source file in the editing phase.
And this is the brilliance of Lightroom. Because we all know text hardly takes up space on our computers! So you kill two birds with one stone so to speak! The Source file always stays the same and the adjustments don’t take up extra space on your hard drive.
One vital piece of advice! Start shooting in raw! The editing possibilities of a raw file are endless in Lightroom. Check out this post about raw vs jpeg to find out why.
Now you know why Lightroom is totally worth your time and money let’s dig a little deeper.
I’ll walk you through the entire process of importing and culling your files in this Lightroom tutorial. Because that’s always the first 2 steps you need to take when you’re editing in Lightroom. And all this happens in the Library Module in Lightroom.
Importing into Lightroom
When you open up Lightroom you’ll most likely end up in the Library Module. If not select Library at the top of your screen.
Step 1: Select Import
On the left side at the bottom, you see 2 buttons: Import and Export. When you select the Import button a new screen opens up. It gives you all the options to import your files into Lightroom.
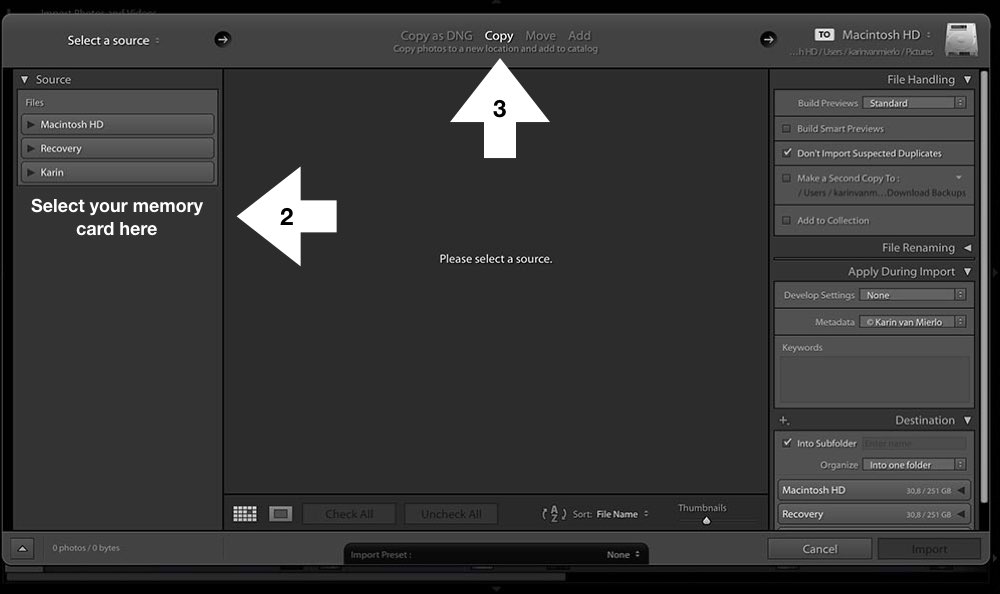
Step 2: Select a Source
In the new screen, you’re prompted to select a source. In this scenario that’s your memory card. Click on the drop-down menu and select your memory card.
Step 3: Select Import Method
At the top of your screen, you’ll find a couple of options. Select Copy. This is the option you want to use when you’re importing from your memory card. It will copy your pixels from the memory card to a location you’ll specify in the next steps. At the same time, it will create the Previews you need to be able to work in Lightroom.
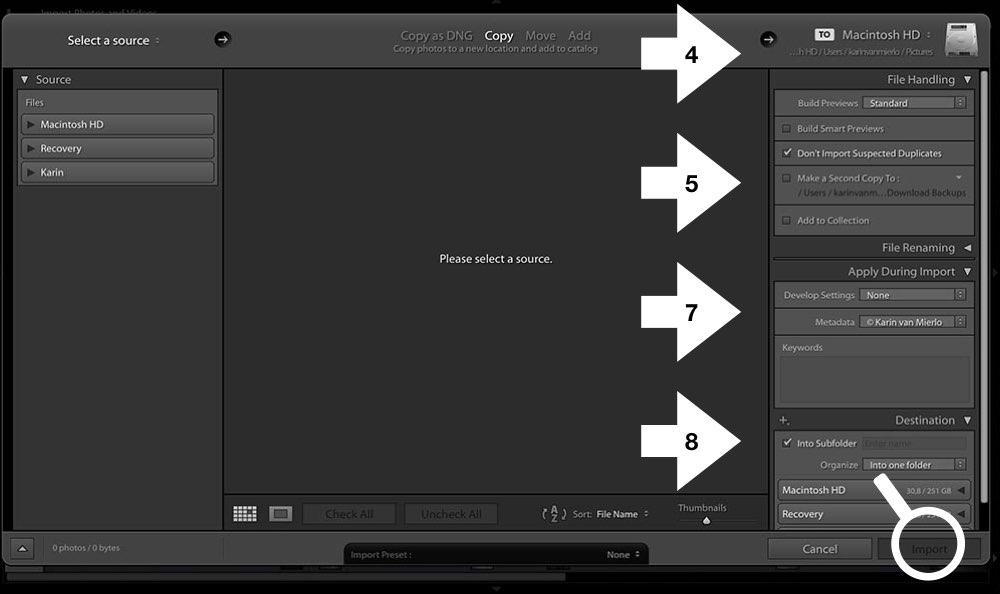
Step 4: Select Location
On the top left side of the screen, you can now select the general location you want your pixels to move to. This will either be the internal hard drive of your computer or an external hard drive. Later on in the importing process, you can specify the exact location you want your pixels to live.
First, we need to take a few other steps. We’re moving down on the right side of the window now.
Step 5: File Handling
In this window, you tell Lightroom how to import your files.
You can leave the Build Previews on Standard.
When you check Smart Previews you’ll be able to work on your Preview files even when they’re not connected to your Source files. Lightroom will sync the files when you reconnect the Source and Preview files.
Check Don’t import suspected duplicates. There’s usually no need to import the same file twice. This is especially helpful if you didn’t format your memory card between import sessions. It will prevent Lightroom to import the same files twice.
If you want to make an immediate back up of your files you can select Make a second copy to. Then specify where you want the back up to go to. Add to collection is a personal choice. I never use this option during import because I make my collections later on.
Step 6: File Renaming
Renaming your files is also a personal choice. I want to keep the original file name while I’m importing my pixels so I rename my images later after I’ve selected and edited them. You have to figure out what works best for you.
Step 7: Apply During Import
In this menu, you can apply presets for developing your images, create and select metadata presets and specify keywords.
I’m not a fan of applying one of the develop presets during import. Once I start post-processing my images I want to start fresh. I want to see for myself how the image looks like straight from the camera. You have more control over the outcome when you apply a preset in the Develop Module.
The second menu is the metadata. You’re probably wondering what metadata is exactly.
Metadata is a set of data that describes and gives information about other data. Yep, sounds like information overload but it’s useful. Trust me! In your image file, it’s all the non-visual information and we can divide this information into 2 separate data sets:
- EXIF Metadata is the information about the camera which is automatically imported with the file. It contains all the information about your camera, the lens you used, the exposure, and other camera settings.
- IPTC Metadata is information you have to put in yourself. You can make this as simple or as complicated as you want but I suggest you at least put in your copyright and your name and your contact information.
Check out How to Watermark Photos for an in-depth guide on copyrighting and watermarking your images in Lightroom.
When you open the drop-down menu select New. In this slightly confusing window, the things to pay attention to are IPTC Copyright Information and the IPTC Creator Information. Fill this in, give your preset a name and click Create. That’s it.
The Keywords section is useful when you want to search for images and you’re not sure where they are. Or when you want to search for all the images you took in a certain location. But this option is only useful when the keywords apply to all the images you’re gonna import.
Step 8: Destination
Okay, we’re almost there! One final step and that is the final destination of your pixels!
You already told Lightroom to send your files to your computer or your external drive. Here you can select the folder you want them to go to.
To create a new folder you can check Into Subfolder and fill in the name of your new folder. You can also share with Lightroom how you want to organize the folder. I always put them in 1 folder but you can also decide to put them in folders separated by date. Whatever works for you!
Yeah! Now hit the import button and watch your pixels jump from your memory card into Lightroom, the place where they will happily live for a long time to come!
And that’s how you import your precious pixels in the Library Module in Lightroom!
Culling Your Images
Now it’s time for the most undervalued and often overlooked phase in photography, culling!
By selecting only the good and strong images you’ll create a more interesting series of photos. A collection of photos your friends and family will love to see! Because, you know, not every image is a keeper. In fact, most of them aren’t. So, now it’s time to separate the chaff from the corn.
In this phase, we’re gonna look for your shining stars and say goodbye to all the pixels that aren’t up to the task of impressing your viewers. Luckily, the Library Module in Lightroom makes this a breeze!
Step 1: Select Folder
Go to Folders and select the folder you imported. You’ll see all your images in the center panel as thumbnails. There’s also a filmstrip at the bottom of the window.
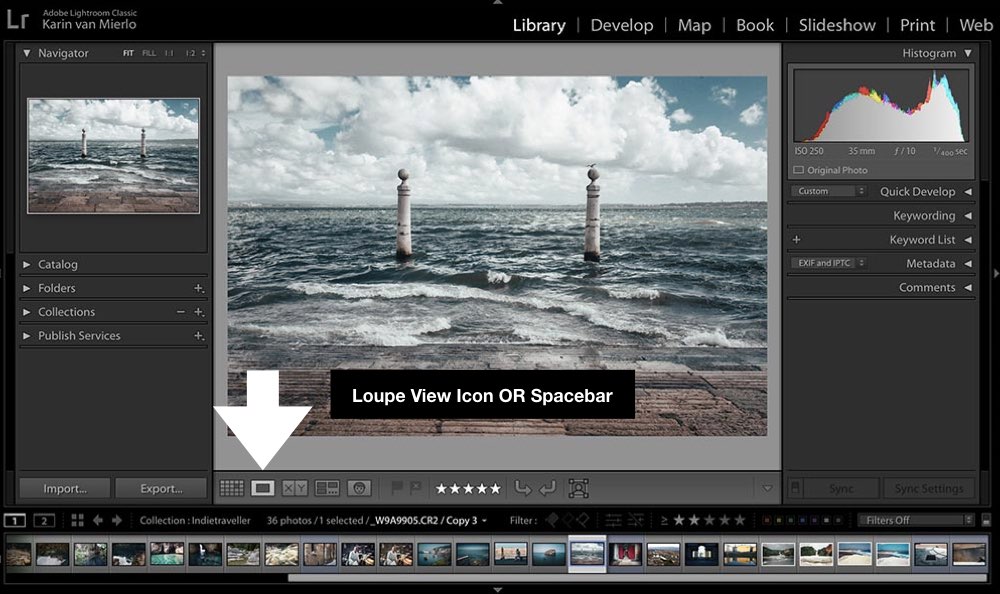
Step 2: Go to Loupe Mode
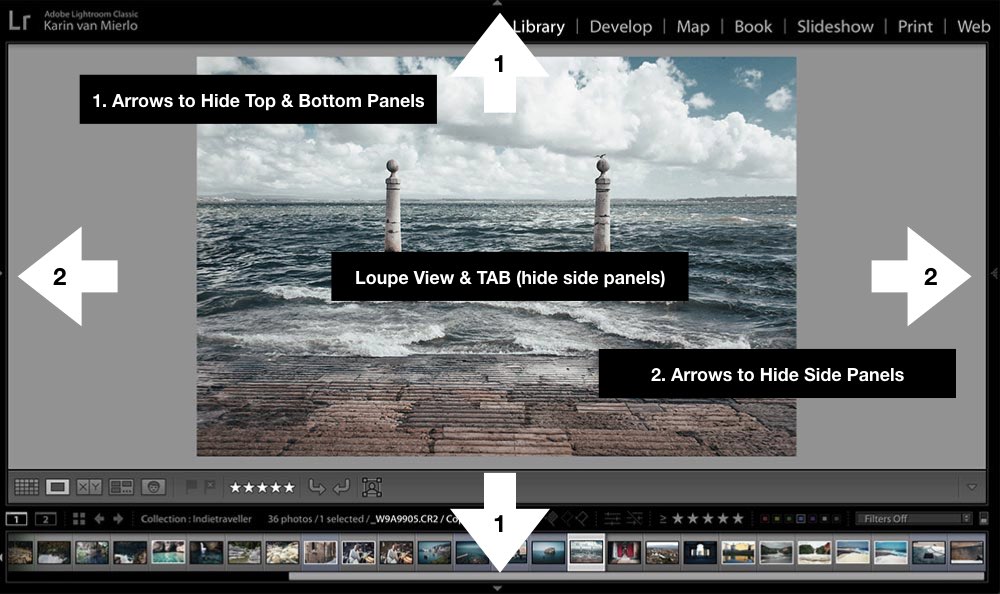
There are always several ways to get to the desired outcome in Lightroom. To see 1 image at the time in the center panel you can either press the Spacebar or select the Loupe View Icon at the bottom.
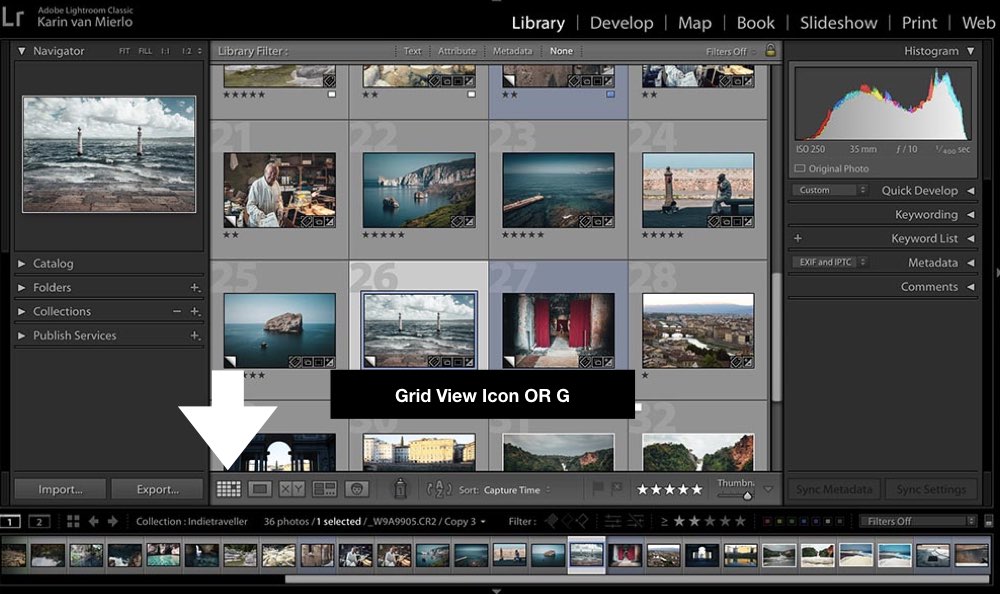
To go back to the thumbnails you either press the G key or select the Grid View Icon at the bottom.
Obviously, the best way to select your images is in Loupe View because then you can actually see them.
Step 3: Select a Screen Mode
This depends on you. If you want to have an uncluttered view of your images you can select the Full Screen Hide Panels Mode. It will show your images without the panels in full screen. Keyboard shortcuts allow you to navigate through and rate your files.
Go to Window at the top of your screen, select Screen Mode and select Full Screen Hide Panels. Of course, there’s also a keyboard shortcut. Command + Shift + F on a Mac or Control + Shift + F on a PC. To go back to Normal Screen Mode you can use the same keyboard shortcut.
But if you’re like me you want to have the Metadata information and the Histogram at your fingertips which is not visible in Full Screen Hide Panels Mode. In Normal Mode, you will be able to see that information.
A quick way to switch to semi Full Screen Mode is to hit the Tab button. It will hide the panels so you can have a good look at your file. Hitting it again will bring you back to Normal Mode.
You can also use the tiny arrows at either side of your screen to make panels disappear and reappear.
Like these Lightroom shortcuts? Check out this post full of time-saving Lightroom hacks and keyboard shortcuts!
Step 4: Flag/Unflag
This is the first phase of the culling process. You’re asking yourself a simple yes or no question now.
If it’s a yes select Flag if it’s a no select Unflag. The images you’re gonna Unflag are the ones that have technical issues. You should also Unflag any images you don’t like for whatever reason.
Of course, you can use the Arrow Keys to navigate through your files but a quicker way is to activate Caps Lock. Once you’ve Flagged or Unflagged a file it will go to the next file automatically. Use the U key to Unflag an image and the P key to Flag an image. You can also use the Flag/Unflag Icons underneath the center panel.
Step 5: Rate Your Images
Once you’ve gone through all the files and Flagged or Unflagged them it’s time for the next step. This time we’re gonna be a little more attentive.
I usually go through my Flagged files a few times and give them stars. First round 1 star, second round 2 stars and so forth. Your selection becomes more narrow every time you go through them. This gives space for the shining stars to surface. At the end of a few rounds, you should have a strong and tight selection of images worthy of your time in the post-processing phase.
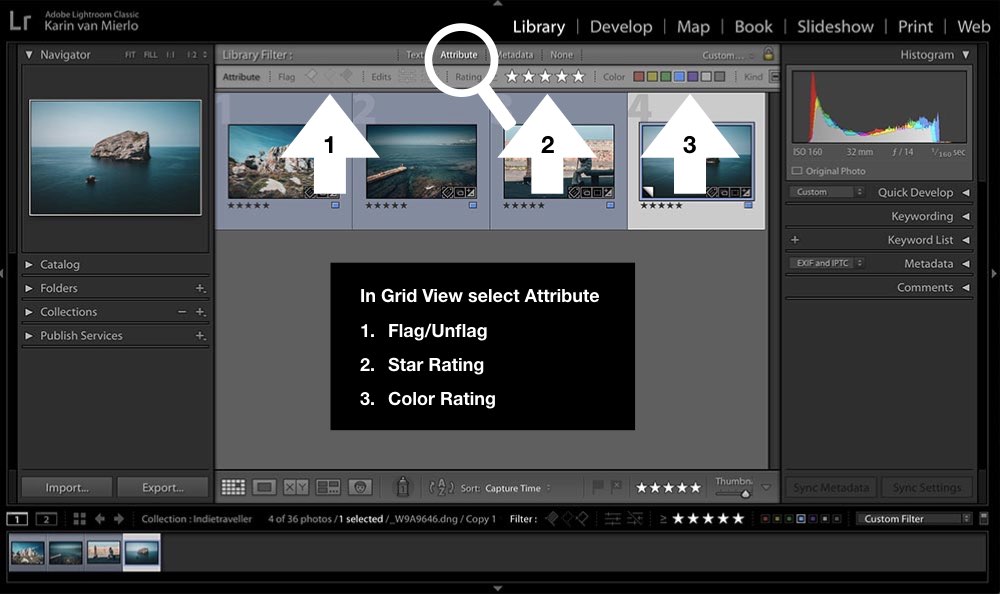
Go back to Grid View by hitting G or select the Grid Icon. Now above the center panel, a new menu becomes active. This is only active in Grid View. When you click Attribute you can set the specifics of the images you want to see. In this case, we started with the Flag/Unflag session so you select the Flag Icon all the way on the left. And hey, what do you know, now Lightroom only shows you the Flagged images.
From here we’re gonna add the star rating. Go back to Loupe View by pressing the Spacebar or select the Loupe View Icon. Give the images you want to keep for now a one-star rating by hitting the 1 key or by selecting 1 star at the bottom of the image. All the images you’re not ready to let go will get 1 star.
Rating Tools
So, to sum it up, there are 3 ways to rate and select your images with the Library module in Lightroom.
- With Flag and Unflag you do your first culling, a simple yes or no.
- Keys 1 to 5 will give your images a star rating. Hitting 0 will erase the star rating.
- Keys 6 to 9 will give your files a color rating. Hitting the same key will erase the color rating.
Step 6: Compare
Now hit the G key again, select Attribute, go to Rating and check ‘is equal to’ 1 star. And you start again. Hit the Spacebar and go through them again but this time you’re gonna be more critical. You’re gonna compare images that look more or less the same and select the best one.
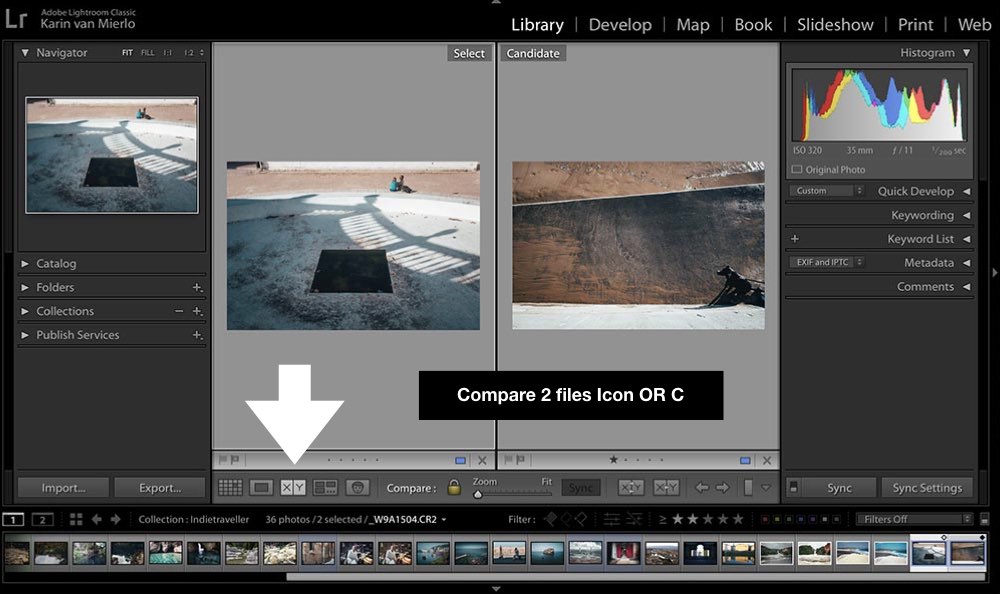
If you want to compare 2 images you select them and click the Compare Icon at the bottom. There’s also the keyboard shortcut C for Compare View.
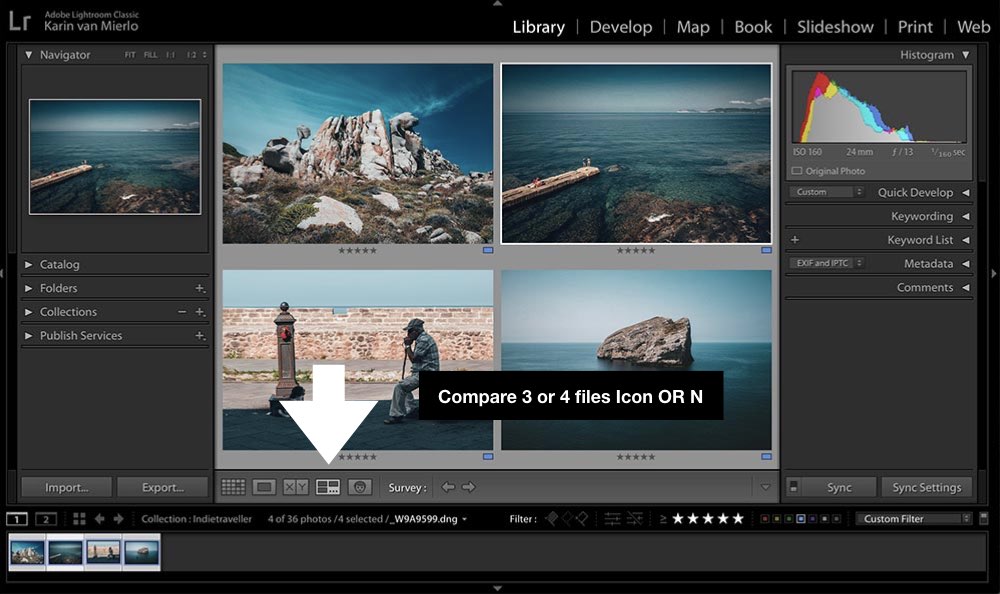
For more than 2 files you can select up to 4 files and click the Survey Icon at the bottom or use the keyboard shortcut N for Survey View.
Step 7: Final Selection
You’ve narrowed your selection down quite a bit by now! Congratulations! I know it’s not the easiest thing to do. You love all your pixels and to let go of some of them is hard. But you have to know it’s for the best. Weeding out the lesser set of pixels makes the really good ones shine even more.
Your final step in this process is to go through them again while you focus on the story, the rhythm of your selection.
Have you been too soft and do you still have a lot of weak pics in your selection? Select only the best ones.
Or maybe you’ve been too harsh and there are holes in the storyline? Go back in and look for the pics that will fill those holes.
Check out this post for awesome tips on how to make a travel photo album.
This is the selection you’re gonna work on in the develop module! So stay tuned for the second episode of the Lightroom Saga: How to Edit Photos in Lightroom.
Did you try one of the tips? Share your photos on Instagram and mention @photography_playground!


0 Comments