

Post-Processing for Beginners
Photography is a trade where almost every part of the process is equally important and plays an important role in getting the best result. Post-processing is the last step and one of the game-changing steps of getting the perfect shot.
It roughly means that you can make any change to your pictures and make the raw pictures into more refined ones.
The process of post-processing for beginners includes everything from cropping, adjusting exposure, and color-correcting, to sharpening. To transform a good picture into a great one you need to know how to edit the images properly, which is certainly not an easy task.
To help you learn easily everything you need to know about the process of post-processing for beginners is mentioned in this article.
The first and most basic question that arises in the mind of the beginner is…
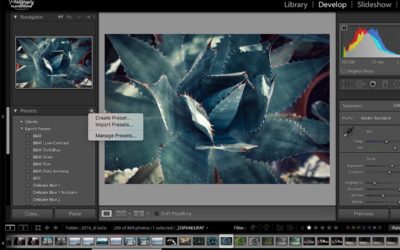
What software to use for post-processing?
Now to answer this question, there are a lot of options for editing and post-processing software available on the internet today.

But out of all the ones available, most professionals, as well as beginners, choose to work with Adobe Lightroom and Photoshop due to their powerful tools as well as their user-friendly interface.
The user-friendly interface of both Adobe Lightroom and Photoshop allows beginners to easily get the hang of it and makes them learn by experimenting as well as enjoy their work.
Wanna get started with Lightroom? Check out How to Navigate the Library Module in Lightroom With Ease
There are other programs and software used by beginners as well such as GIMP (GNU Image Manipulation Programme), Canva, Pixlr, Snapseed, etc.
All the options mentioned above are said to be free or cheaper alternatives to Adobe Lightroom and Photoshop. They have a bit of a learning curve but offer tools with the most basic to advanced tasks in mind.
The next thing after choosing software to work with is a solid picture to work on.
A Solid Picture to Work on
Many starting-out photographers believe that a bad picture can be salvaged and turned into an exemplary picture but it is not true.

You can’t do so no matter how much work and time you put into that picture. To learn more about post-processing and to experiment on pictures you first need to have a solid picture that will work.
After experimenting with a few pictures you will discover that not every picture can be enhanced by post-processing.
In post-processing for beginners, you need to be picky with the pictures you work with. You will most likely learn this lesson with more and more experimenting as well as experience.
Tips for Post-Processing for Beginners
You can learn all about the effects and everything you can do with post-processing with time but there are some basic tips and tricks that can help you get started.
Sharpen the Image
Sharpening an image just means that you make it look a bit clearer and enhance the edges of objects in an image.

Every image can do well with a little bit of sharpening. It is one of the basic features in post-processing for beginners that can be found in basically all software whether it be Adobe Lightroom or one of the free and affordable alternatives.
Sharpening is important for an image but be sure not to overdo it as it can introduce noise in the picture which doesn’t look good.
Adjusting Exposure and Contrast
Exposure and contrast are both dependent on light.
More specifically exposure means the amount of light captured in an image and the resulting brightness of the image.

Example: as you can see these two same images, I just updated exposure + contrast and it makes a huge difference.
So contrast on the other hand means the difference between the lightest and darkest part in a picture.
Both contrast and exposure play an integral part in creating a photograph and play an important part in creating a photographer’s vision.
By adjusting both of them you can bring out the best in your picture. These are also some of the basic features available in almost all editing software present out there.
In post-processing, you can increase or decrease the exposure and the brightness of the image.
In case of contrast, increasing it can make dark areas darker and light areas lighter.
There are other tools like curves tool and shadows/highlights tools that can help with adjusting contrast as well.
Color Correction
Color is the thing that makes your image stand out from the others. Every color is known to express a specific feeling.
Find out more about color: 5 Creative Ways to Find the Magic of Color

Photo by Greyson Joralemon on Unsplash
Hence it can be said that using the right colors in your pictures can let the audience know your feelings.
If you are unable to control the colors while clicking the pictures you don’t have to worry you can do so in post-processing. There are many things you can adjust like hue, saturation, and luminance. Each of these can help with color in their way.
With the hue slider, you can change the exact shade of color, and sliding the luminance changes the lightness or darkness of the shade. Saturation controls the intensity and vibrance of the color.
There is also a white balance filter which can help you in adjusting your pictures if you think it is too cool or too warm.
Noise reduction
Noise can affect your picture in a bad way. The graininess in your pictures can result in color inaccuracy and even result in a loss of detail.
To get rid of the noise you can use the noise reduction feature present in your editing software.

You can pay a bit more attention to the noise in the area with a lot of shadows. Noise reduction can increase the quality of your picture drastically.
You can check some noise reduction software to make sure you’re showing better picture quality to your audience, but for instance, Adobe Lightroom has a fine noise reduction tool.
Watermark your Work
Well, the watermark is one of the things that get you the credit you deserve for your work.
A watermark on a picture can be used to identify it back to you as the photographer and help you build your reputation in the photography industry.
To put it more simply it is important to put a watermark to any professional shot you share so people can know it’s your work.
FAQ about Post-Processing
Some questions asked frequently about post-processing for beginners are answered below…
Why is post-processing important?
Post-processing can play a vital part in photography. It helps you to improve the quality of your work not just in one way but many.
You can enhance the quality of your pictures, correct mistakes, and retouch, it can even help you express yourself as an artist by giving them your touches.
There is no limit to what you can achieve in your pictures using post-processing, especially when you’re photographing in the Raw file format.
Do I need expensive software to learn post-processing?
Adobe Lightroom and Photoshop are professional software for post-processing and have more advanced features but there are a lot of free or affordable alternatives available as well, Some of these alternatives include GIMP, Snapseed, etc.
Check out How to Create the Perfect Black and White Photos in Snapseed
This software has fewer advanced options than Lightroom and Photoshop but still, they can work wonders on your image in terms of editing and enhancing them.
When should I start to learn post-processing?
The best time to start learning about post-processing is as soon as you learn to click a solid picture or when you start learning photography.
As mentioned above post-processing for beginners can help you enhance the picture you click and get the desired result.
Conclusion
Using a camera, a photographer can capture a scene, but by using editing or post-processing he can bring his vision come to life.
You can adjust exposure, hue, luminance, and other factors which can help you achieve your vision and beautify your original picture.
With the advancement in technology, we can introduce more and more features and make the editing software more and more sophisticated.
Today there is more and more AI editing software present in the market as well which can do the editing for you, you just have to tell them how you want your picture.
Learning editing or post-processing as a beginner is an important part of your journey as a photographer. You’ll learn a lot of things about photography and improve with time.
Hope this article helps you in your journey as a beginner…


0 Comments