

How to Edit Photos in Lightroom
In the previous Lightroom photography tutorial, I walked you through the very important process of importing and selecting your files. If all is well by now you have a couple of pics selected that you wanna edit. In this Lightroom tutorial, I’m gonna show you how to edit photos in the Develop Module in Adobe Lightroom.
If you missed the first blog post with Lightroom tips you can read it here How to Navigate the Library Module in Lightroom With Ease.
And here’s a post with 25 awesome Lightroom Hacks.
And if you didn’t sign up for the 7-day trial go here to try out Lightroom for free.
Let’s first talk about why editing your photos is super important before I’m gonna dive into the Lightroom photo editing techniques and show you how to edit photos in Lightroom.
Why is Photo Editing Important?
Especially if you’re shooting in raw your images are gonna need at least some basic photo editing. You see, raw files are a little flat and undersaturated by nature. That’s because it stores all the information it can gather the moment you press the shutter. And it is your job to accentuate the elements in the photo you want to pop out of the frame. The place to do that is Lightroom.
Read More: Raw vs Jpeg: 9 Irresistible Reasons to Shoot in Raw
The goal of Lightroom editing is always to get the best out of a photo. And to underline and emphasize your vision. It’s not meant to make a bad photo look good. The ingredients for a strong photo should be inside the file, to begin with. If it’s not in the image no editing software can get it out. It’s as simple as that.
I really love photo editing with Lightroom because the editing process is so intuitive and logical at the same time. It also saves me a ton of time. That’s time I can spend photographing new work.
Wanna know more about editing your photos in Lightroom? Keep reading and I’ll show some basic editing techniques. I’ll also share a few images of before and after in Lightroom.
Once you’ve selected the images you want to edit you go to the Develop Module in Lightroom. On the left side of your screen, you’ll see a few panels.
Lightroom Beginners Tip
But let’s start with a Lightroom beginners tip. When you’re new to Lightroom it’s a good idea to start by going through all the panels and experiment a little bit. Just hit those sliders and drag them into the extremes to get a feel for what the Lightroom editing app can do for your photos. When you’re done experimenting hit Reset and your file will go back to its original state.
Check out this post if you’re interested in awesome time-saving Lightroom hacks and essential keyboard shortcuts.
Left Panel
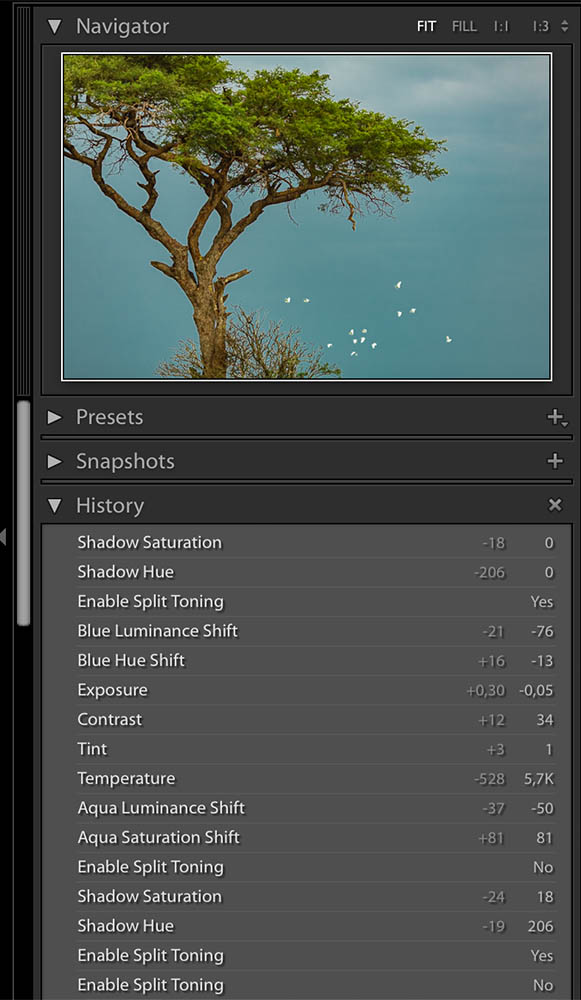
Navigator: this is where you can zoom in or out and you’ll be able to see the area of the file that’s zoomed in.
Presets: Lightroom gives you a few presets and you can make and save your own presets here. A preset is like a recipe and it allows you to edit several files the same way.
Snapshots: with Snapshots, you can save a version of the file. You can do this when you’re not sure about your next editing steps but wanna try things out. I never use this feature because you can always go back to a previous version in the History panel. A better way to create different versions of the same file is to create a virtual copy. Just right-click and the option becomes available.
History: in the History panel Lightroom saves every editing step you took. You can roll back to any of the previous steps. Be careful not to click on the cross icon at the right side because then you’ll delete all your editing steps.
Collections: the Collections you made in the Library module show up here.
If you prefer an uncluttered workspace you can keep all the panels closed. But I advise you to keep Navigator and History open. Because those are the ones you will use a lot while you’re editing photos in Lightroom.
The right side of your screen is where all the magic happens. I’m gonna give you a quick overview of all the panels. After that, we’re gonna dive deeper into a few of them and I’ll show you some Lightroom examples.
Right Panel
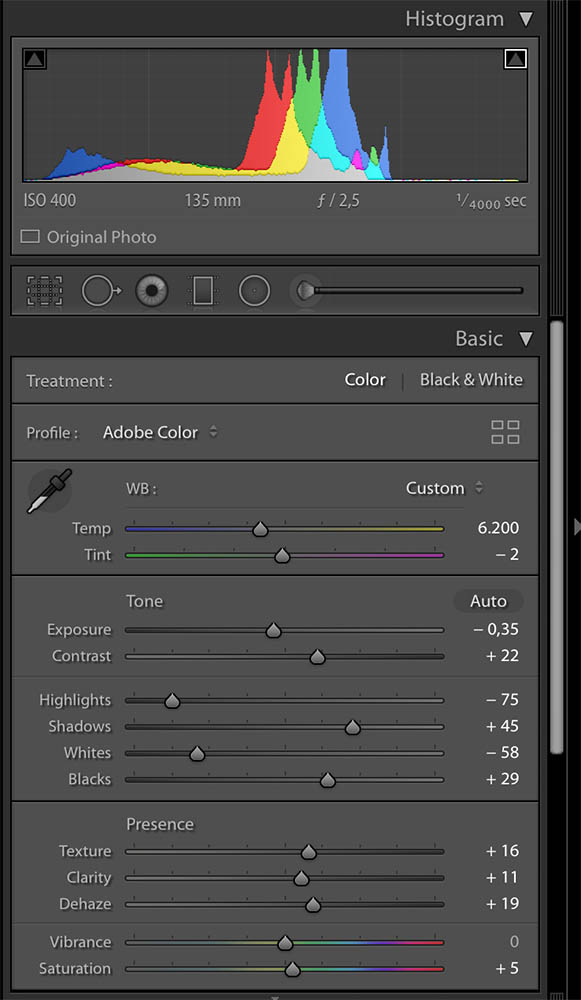
Histogram: shows you the distribution of all the brightness levels. On the left are the dark levels and on the right are the light levels. Here you can also see the exposure info of the file. Underneath the Histogram are the local adjustments tools and the Crop & Straighten tool.
Basic: in the Basic panel you have all your basic adjustments tools like white balance, exposure, contrast, presence, and saturation.
Read More: The Ultimate Guide to Essential Photography Terms & Definitions
Tone Curve: the Tone Curve is an advanced tool. You can adjust the contrast but also the overall brightness of the file without adjusting the blacks and the whites.
HSL/Color: we’re getting a little more sophisticated in this panel. Here you can adjust the colors separately and you can influence them on different levels. That’s what the HSL stands for. Hue is what I call the quality of the color, Saturation is the vibrancy of the color and Luminance is the brightness of the color.
Split Toning: with this tool, you can influence the color of the Highlights and Shadows separately.
Detail: in the Detail panel Detail you’ll sharpen your files. And if it’s necessary the place to reduce noise as a result of a high ISO.
Lens Corrections: here you can select the lens you used so Lightroom can correct the lens distortion.
Transform: a tool to use in moderation. It corrects perspective distortions.
Effects: houses 2 very different tools. With Vignetting you can add a vignette to the edges of your file. With Grain, you can add a grainy look.
Calibration: this is the color calibration of your file. Unless you know what you’re doing it’s best to leave this closed for now.
Lightroom Overwhelm?
Let me take a wild guess here. You’re feeling pretty overwhelmed by now. Well, the good news is you don’t need all the tools to edit your photos. There are a few tools that are vital to the editing techniques I’m about to share. But just as on the left side panel you can close all the panels you’re not gonna use.
So let’s start by doing that. Close all the panels apart from Histogram, Basic, HSL/Color, Detail and Effects.
Once you’ve done that, let’s get into the nitty gritty of editing photos in Lightroom with some before and after Lightroom examples.
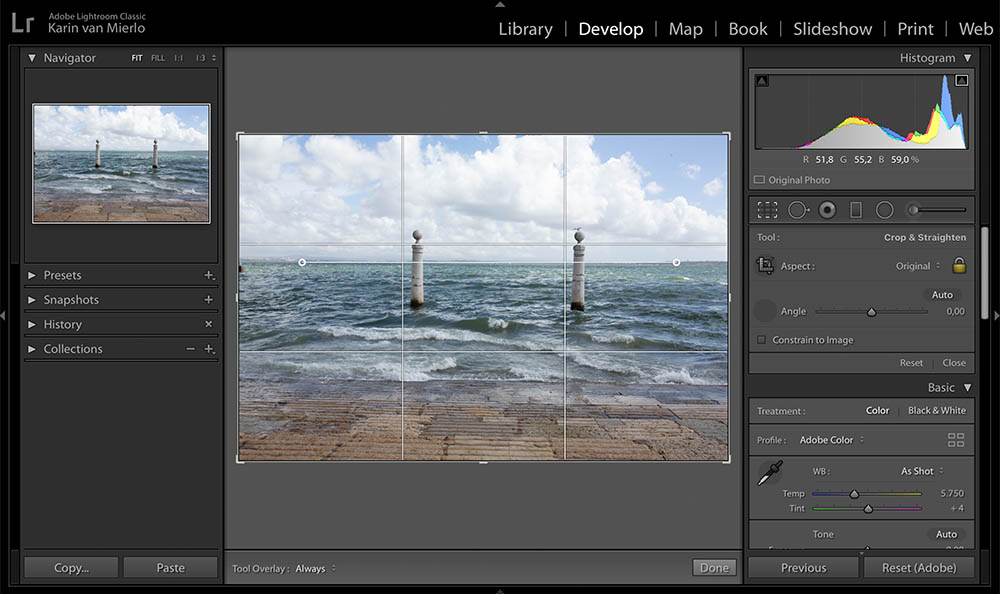
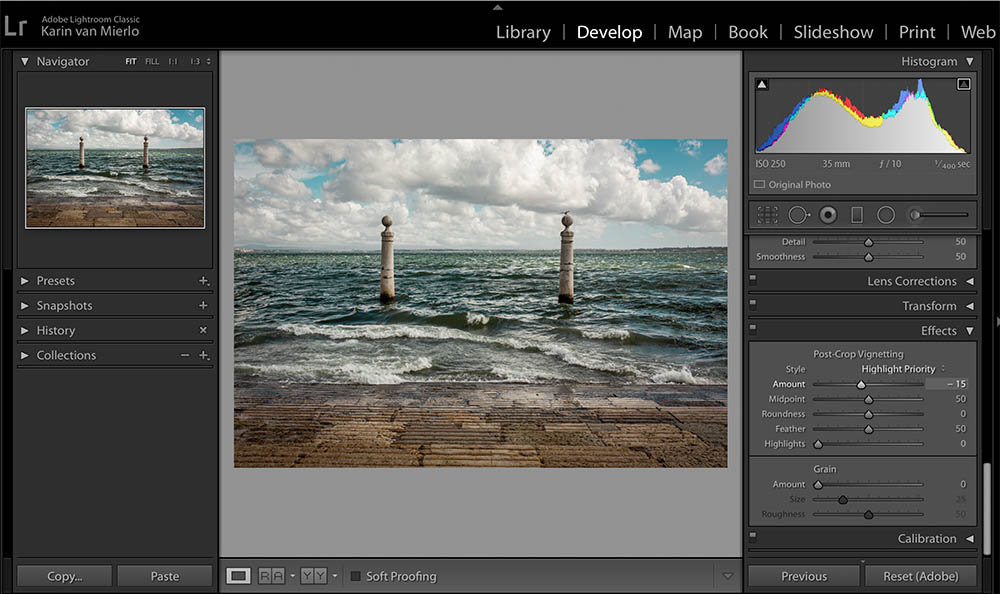
#1 Crop & Straighten
So let’s take a closer look at the panels we’ve kept open. At the top, just under the Histogram you have the Crop & Straighten tool on the left.
Aspect Ratio
Usually, this is my very first step in editing. In here you can adjust the crop of your image and straighten horizontal or vertical lines. Next to Aspect Ratio you will see a drop-down menu where you can change the aspect ratio of the file should you want to. You can also keep it at original. Then just hover over the corners of the image and you’ll be able to drag the corners inwards.
Angle
Underneath Aspect Ratio you see Angle. With this tool, it’s super easy to Straighten the horizon. The cool thing is you can click on the little icon and it changes your cursor into the tool. When you go inside the file and click on the left side of the horizon and then move to the right side and click again Lightroom will automatically adjust the crop to create a perfectly horizontal horizon.
In the photo above, I straightened the horizon and cropped it to get a more balanced composition. The standard grid is a 3 by 3 grid which allows you to adjust the crop according to the rule of thirds.
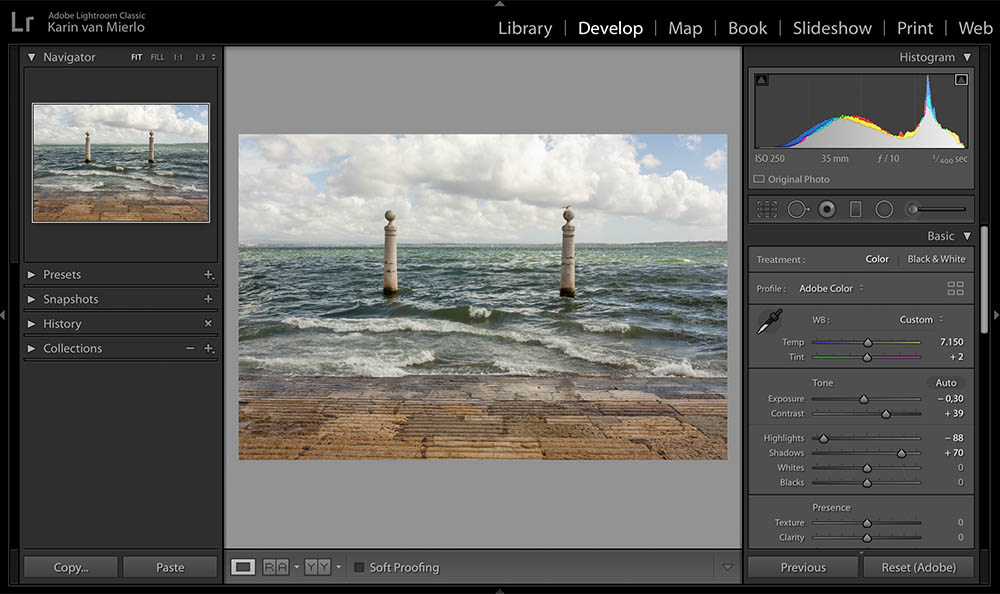
#2 White Balance
Okay, now we have a well cropped and aligned photo. Let’s move on to the next phase. It never hurts to check if the white balance is correct even if it looks fine to you. When you click on the little eye-dropper tool and click again in a neutral area (a few light levels away from white) Lightroom will adjust the white balance.
You can also select an option from the drop-down menu or use the sliders. Remember you can always go back to the previous version in the History panel on the left. You can also use the keyboard shortcut Comm+Z if you’re on a Mac or Ctrl+Z if you’re on a PC.
I adjusted the White Balance slightly to get a warmer overall tone in the photo.
#3 Tone & Presence
This might feel counterintuitive but I always start with filling in the Highlights and brightening up the Shadows. By doing that I decrease the contrast first. After that, I adjust Exposure and Contrast. Usually, I’ll also hop on over to the Presence sliders and introduce more Texture, Clarity, and Dehaze. This also does something to the contrast.
I want this image to have a dark and moody atmosphere. So after sliding Highlights almost completely to the left and Shadows to the right I decrease the Exposure a little bit. Then I increase the Contrast quite a lot.
In the Presence panel, I increase all values by sliding to the right. You need to be careful with these values. It’s very easy to overdo it. I usually zoom in to see the effect of the adjustments and then zoom out to get an overall view.
Then I decrease the Saturation to make the colors a little less vibrant. Remember I’m going for a dark and moody look here.
Then I’m going back to the Tone panel and introduce more Black to make the shadows darker.
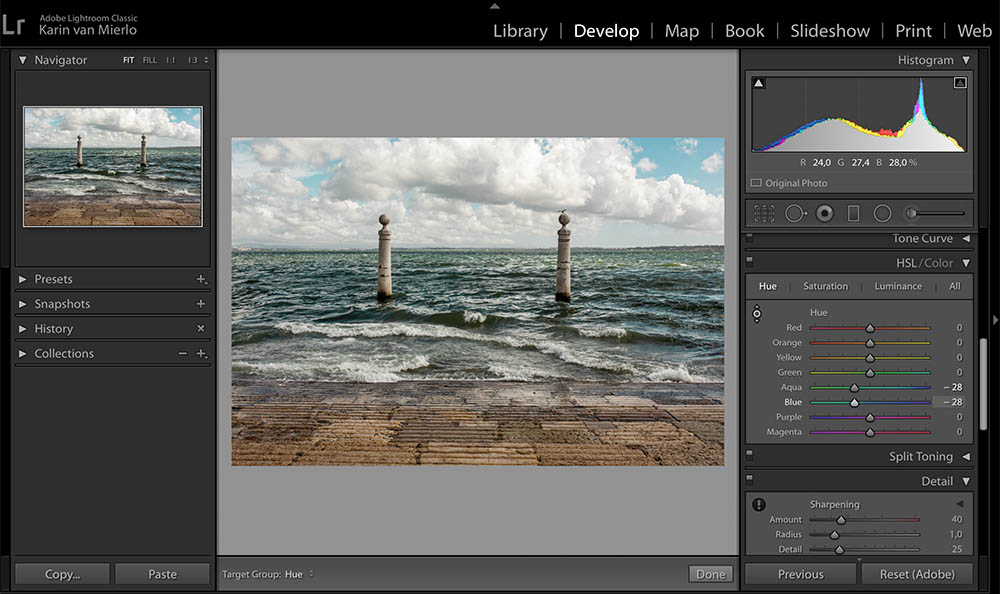
#4 HSL/Color
This is a personal preference but I always like to work on the colors. The HSL panel is a little more advanced so if it feels overwhelming you can skip this step.
In the left corner of the panel, you see a little icon. If you click on the icon you can drag it into the file and click on the color you want to adjust. In the slider section, you can see the color(s) the tool is working on. By using your mouse wheel or your trackpad you can move the sliders.
For this image, I worked on the blue tones. I want to make them a little more expressive.
So I start in the Hue panel and change the blue to a more aqua tone.
Then I select the Saturation panel and increase the saturation of the same blue tones. I darken those same tones in the Luminance panel.
As you can see the difference is not world shocking but just enough to make the blue a little more interesting.
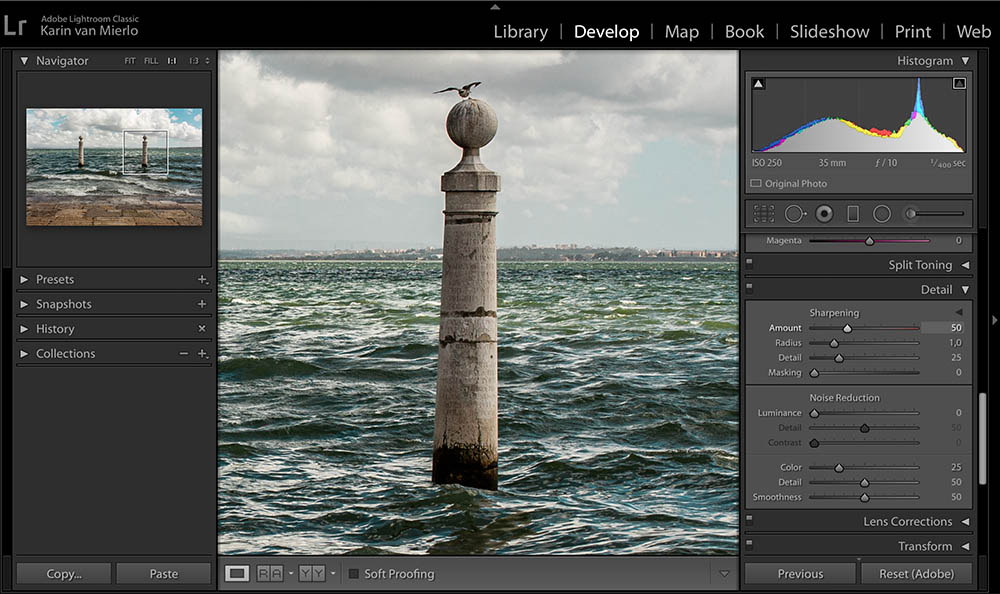
#5 Sharpening
A raw file always needs sharpening because that’s not done in-camera. It’s easy to overdo the sharpening so be careful.
Depending on the file, of course, it’s somewhere between 50 and 80. You can see the right side of the slider gets red alerting you to not go that far. When you’re sharpening it’s best to zoom in to a 100 percent to make sure you’re going too far.
In this case, I set the Sharpening on 50 leaving all the other values as they are.
#6 Effects
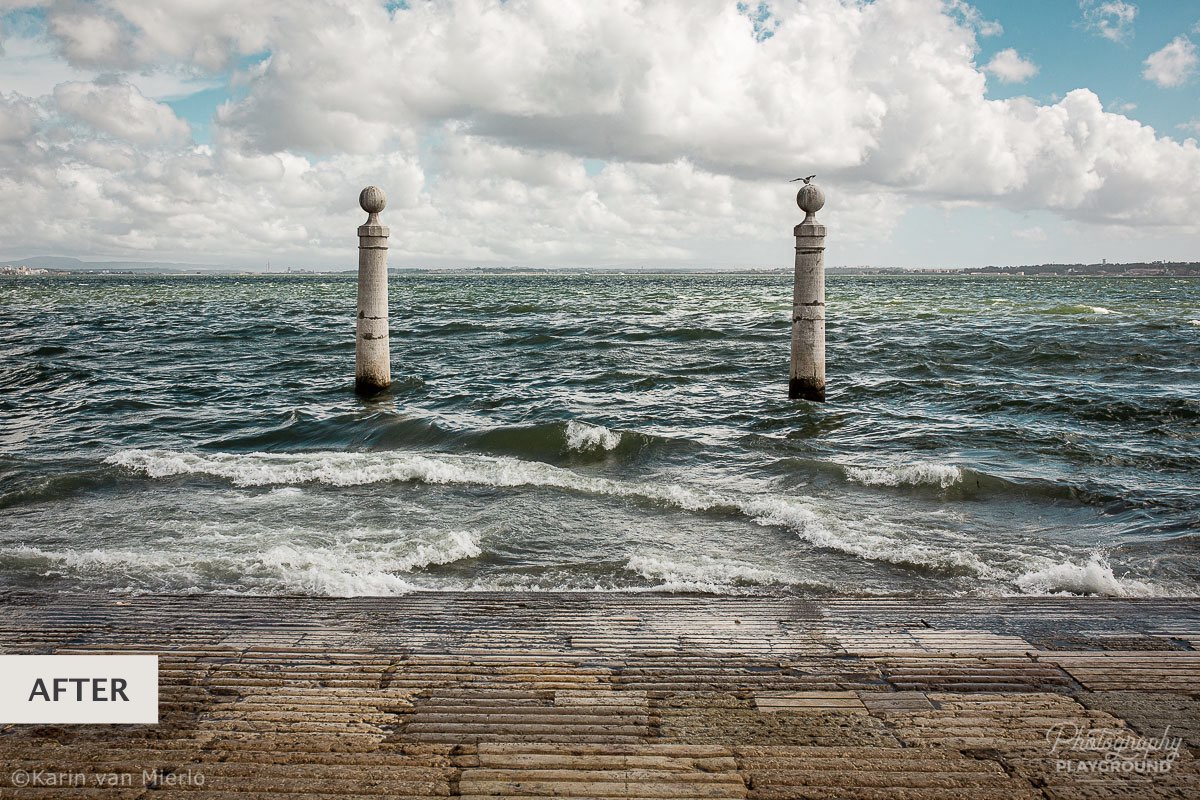
If it’s appropriate a vignette can help a photo a lot. Again, don’t overdo it. If you can see the borders of the vignette it’s too much.
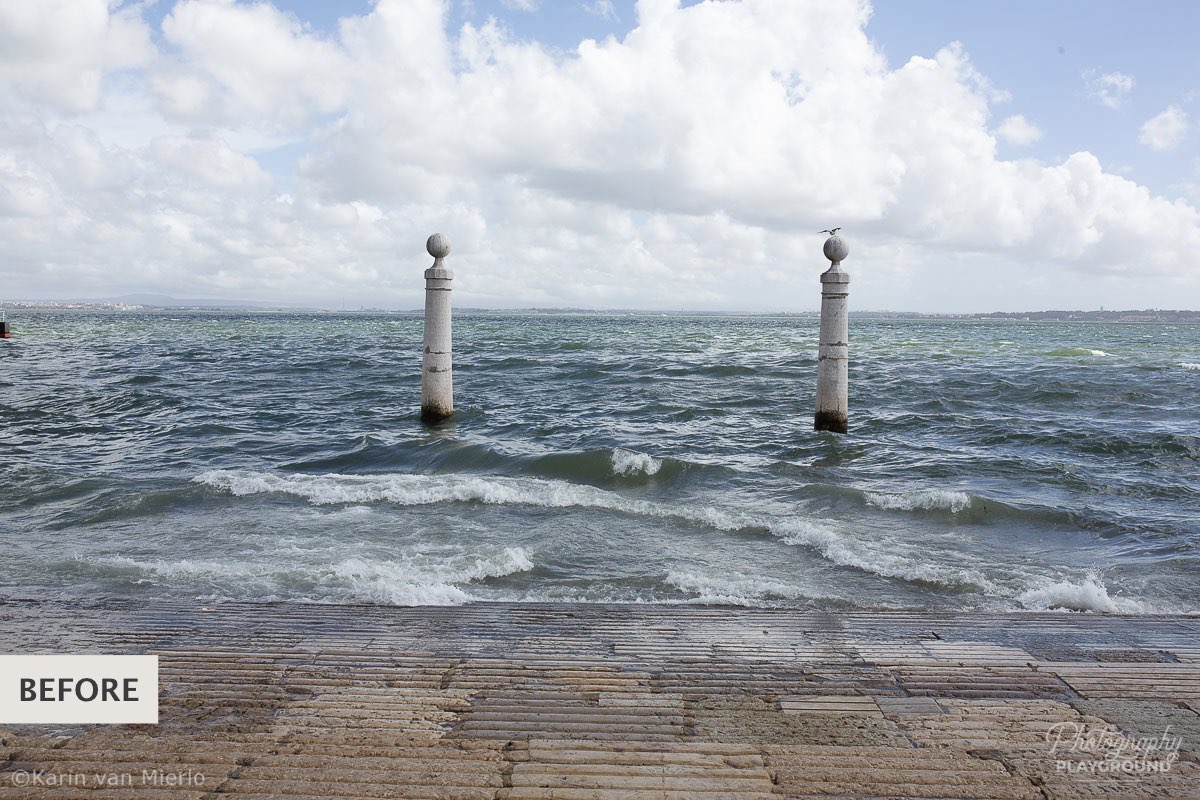
For this photo, I want to make the edges a little darker to get more attention to the middle area of the photo where the 2 columns are.
I set the slider at -15 and leave the rest of the settings as they are.
#7 Readjust
Often after I’ve applied a vignette I go back into the Tone panel to brighten the image up. To increase the contrast between edges and center part.
#8 Export
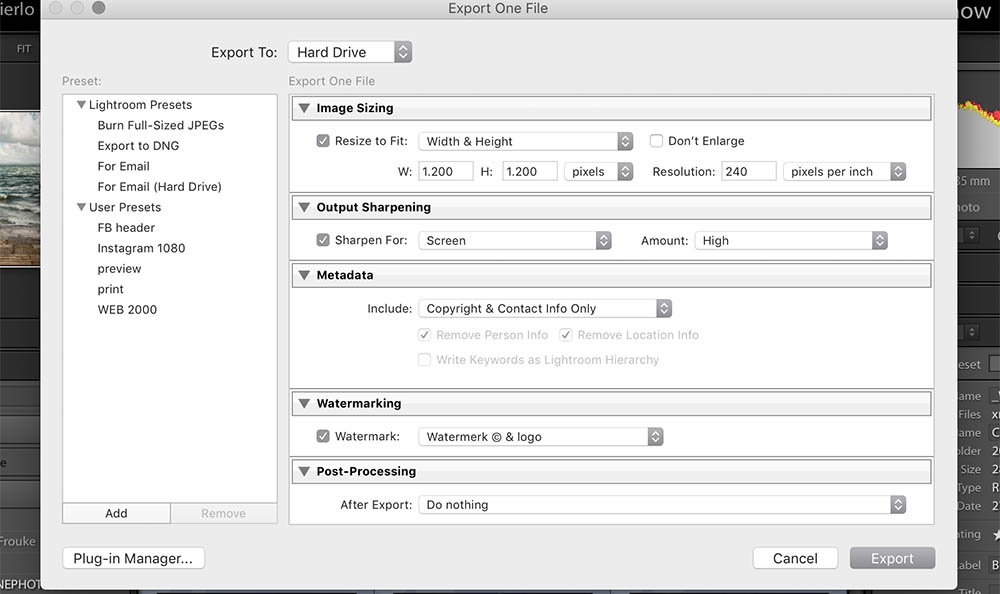
When you’re done editing a bunch of files and you’re happy with how they look you need to export the files. The files that live in Lightroom are not suited to share with the world so you have to get them out of Lightroom. To do that you go back to the Library module. You select the files you want to export and you hit Export at the bottom left of your screen.
Export Window
A new window will open up where you can determine your export settings.
Export Location: on top, you can tell Lightroom where you want to send your files to.
File Naming: is where you can rename your files should you want to.
Video: keep it closed.
File Settings: set Image Format to JPEG, Colorspace to sRGB and Quality anything between 50 and 100 depending on how large you want your files to become. Usually, if it’s for the web a setting of 65 is the sweet spot between file size and file quality.
Image Sizing: set the size of your image. You can also leave this one unchecked and Lightroom will export the file in its original size.
Output Sharpening: set the sharpening for your intended goal of the files. If it’s for the web you set it on Screen. There are also 2 options for printing. Because I’m careful with sharpening inside Lightroom I always set the amount on High. This is something you’ll need to test out for yourself.
Metadata: tell Lightroom how much metadata you want to include in the file. I would suggest at least your copyright information.
Watermark: create and include a watermark in your image.
Post-processing: I always have it set on Do Nothing. But choose the setting you prefer.
Yeah, you’re done! Now hit the Export button to export your files.
Before and After in Lightroom
Okay, let’s look at a few other before and after Lightroom examples.
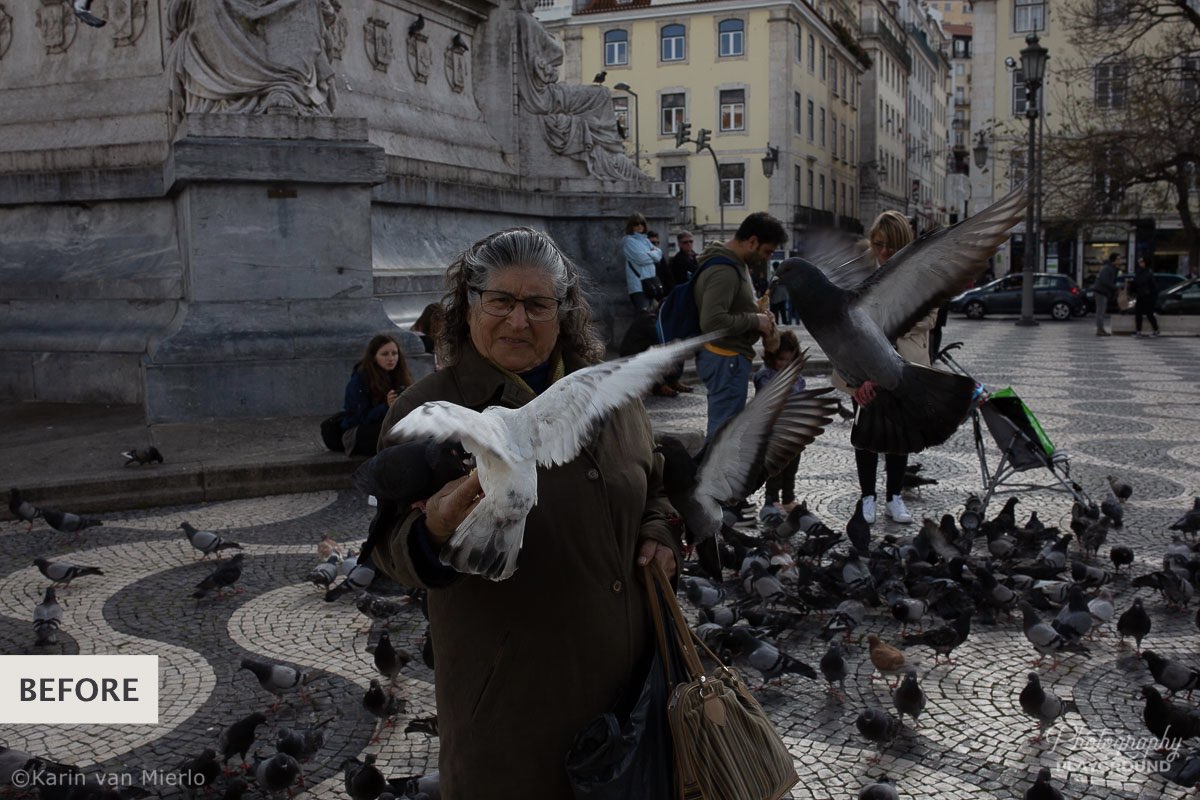
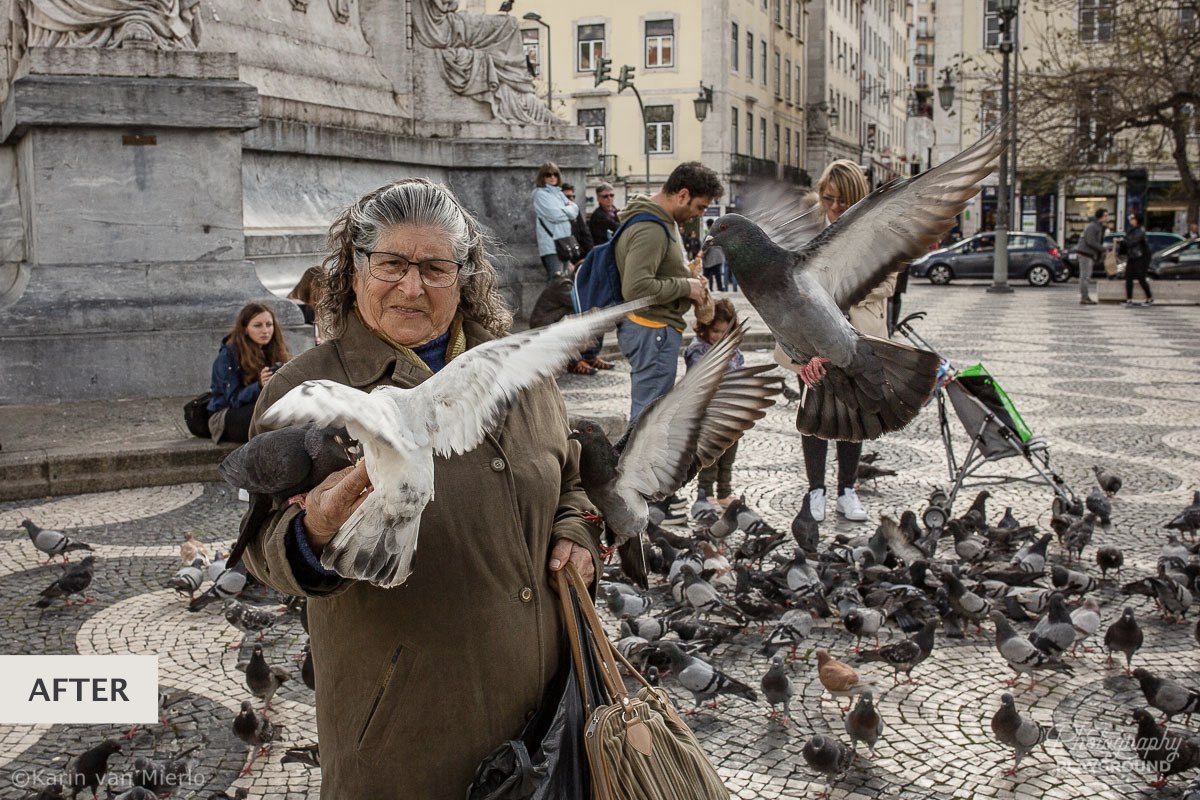
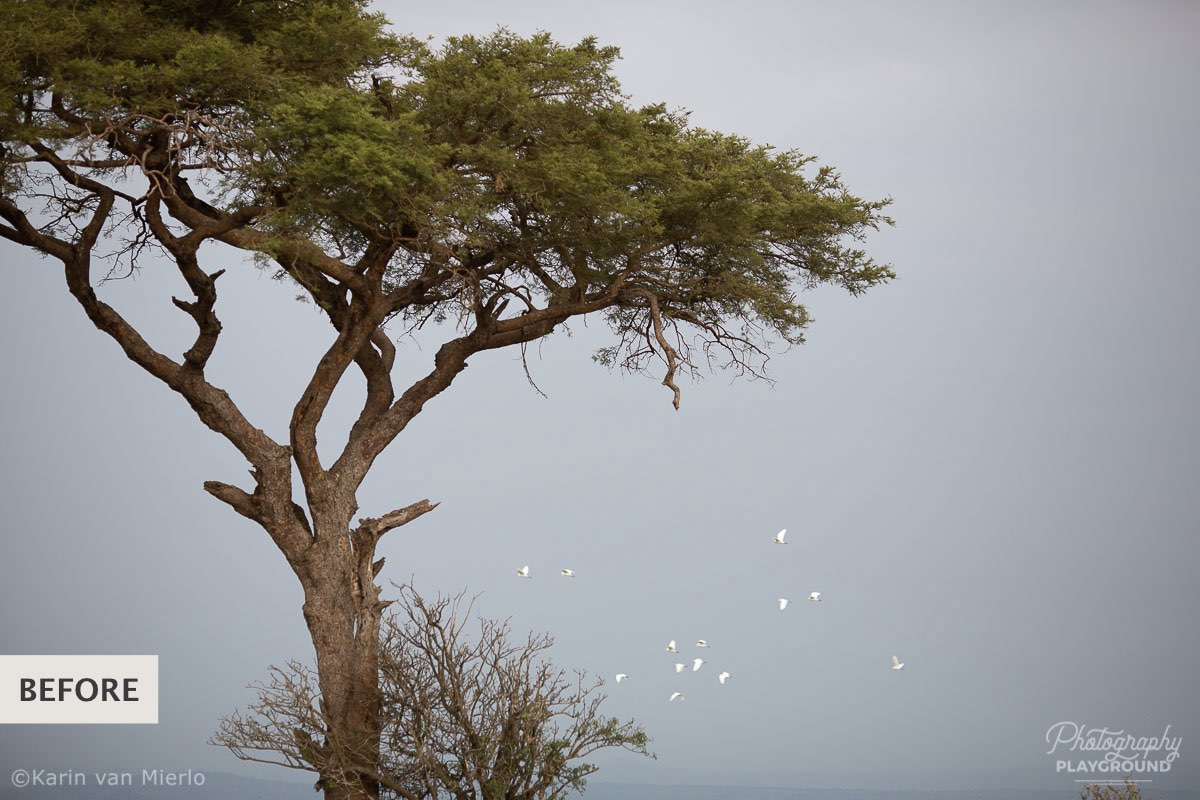
This image is a little underexposed. I also think the composition is somewhat unbalanced. The main goal for the image is to brighten it up and draw the attention to the woman’s face and the pigeons.
The areas I worked on are:
Crop, White Balance, Curves, Tone & Presence, Vibrance, Vignette, and Sharpening.

Don’t you just love this proud mama! However, the file is very flat and the white balance a little off making it look a little smudgy.
The areas I worked on are:
White Balance, Curves, Tone & Presence, HSL/Color, Vignette, and Sharpening.

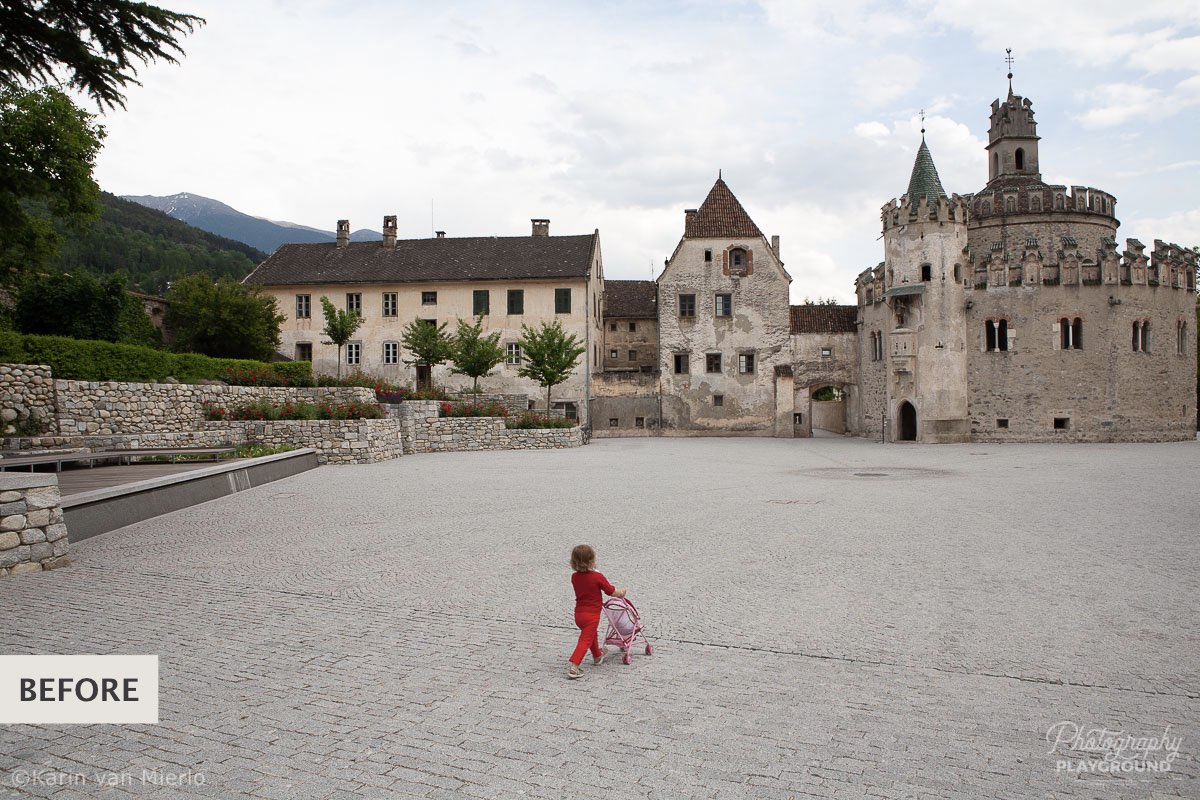
This is an image that could be easily overlooked. But with the right editing it has potential. The most important thing is to give the sky more presence and color.
The areas I worked on are:
Crop, White Balance, Tone, Presence & Saturation, HSL/Color, Split Toning, and Sharpening.
When you’re using Lightroom you should go back and forth between the different panels. Because every setting influences the other ones. It’s a lot of adjusting and readjusting until you have the perfect edit.
After using Lightroom for a longer time you can develop your unique Lightroom editing styles with Lightroom presets.
Although Lightroom is the best it’s not the only editing software out there. This guide shares alternatives to Lightroom.
Let us know in the comments if you have a question about editing photos in Lightroom. I’ll be happy to help you.
Did you try one of the tips? Share your photos on Instagram and mention @photography_playground!


0 Comments