
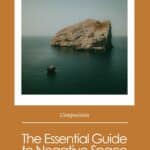
Negative Space Photography
Did you ever look at your photos not knowing what it was you were actually trying to capture?
You’re asking yourself, what is this photo about? There’s so much going on, I can’t even see a clear subject.
If this sounds familiar to you, you probably didn’t pay enough attention to your composition. You didn’t stop and think for a moment, what am I about to photograph? How can I position my subject in such a way that it’s crystal clear the photo is about them?
It’s a very common problem to have so much going on in the photo that both you and the viewer have no clue what the photo is about. Especially if you’re new to photography.
Making clear to yourself and, just as important, to the viewer what your subject is, is a vital step in making beautiful and interesting photographs.
So, if you’re looking for a simple and elegant way to make your subject stand out, keep reading!
Because we have a very special composition tool in photography to tackle that problem and it’s called negative space photography.
Click here to discover the 4 Essential Principles of Composition in Photography.

What is negative space photography?
Negative space refers to areas in the photo where there’s not much going on. Sometimes even nothing.
It can be the background or the foreground, but the main idea is that it’s a homogenous space containing similar elements.
There are no distracting elements, and nothing stands out.
So, negative space can be elements in your frame like the sky, a body of water, a treeline, the pavement, a big patch of sand, a field of grass, a wall, etc.
When you imagine these elements, you can already picture them as homogenous and similar, right?
But it also sounds a little boring. Why would you want to make a photo of just that! Well, the whole point of negative space photography is that there should also be positive space.
Positive space is your subject.
In negative space photography, the negative space always outsizes the positive space. The negative space functions as a counterbalance to the positive space.
Negative space is also referred to as white space or empty space. It’s a very powerful tool to create an intriguing image.
Let’s find out why it’s so powerful.

The purpose of negative space photography.
Makes the Subject Stand Out
As I already said, an important reason to make use of negative space photography is to make the subject stand out.
There’s no way around what you want the viewer to focus on. It is literally the only thing of interest in the frame.
And because of that, it draws the viewer into the photo.
It Creates Dynamic Balance
One of the things composition needs to do is to create a harmonious and balanced photo. A photo that pleases the viewer’s eye.
You can make use of static balance and dynamic balance. An example of static balance is a symmetrical composition. This can be very pleasing to the eye but also a little…well, static.
Negative space photography is all about creating dynamic balance. What do I mean by that?
Dynamic balance is about the visual weight of all the elements in the frame, and the tension between them.
Now, you might think that visual weight describes the actual size of the different elements. But nothing is further from the truth.
Visual weight is about the visual impact these different elements have.
The subject has a high visual weight.
The negative space has a low visual weight.
When you decrease the actual size of the subject and increase the size of the negative space you create a unbalance in the sizes of the different elements. But because of the visual weight, a dynamic balance emerges. Still with me?
Used like this negative space creates dynamic balance because it creates tension between the different elements.
The subject attracts all the attention even though it takes up little space in the frame and it’s counterbalanced by the more expansive negative space.

It Tells a Story
The tense relationship between the positive and the negative space tells a story.
That’s why it’s intriguing and can even add a little drama, especially if you take it quite far.
It can evoke feelings of isolation or smallness, but also feelings of intimacy or being empowered.
It’s Minimalistic
Negative space photography also emanates a sense of calmness and quietness. It can feel peaceful and minimalistic because adding a bunch of nothing results in a clean and clear image.
Because it gets rid of all the distracting elements, it’s calming and easy on the eyes, creating a mindful and contemplative feeling.
It adds breathing room so there’s space for your eyes to rest.
Click here to explore more Mindful Photography Tips.

How to Achieve Negative Space Photography?
Look For It
The simplest way to achieve this is to look for backgrounds or foregrounds that are similar.
There are a lot of options out there. Make sure the colors don’t collide because that would take away from the homogenous character negative space needs to have.
So, be on the lookout for a weathered wall, a field of lush grass, a patch of sand, etc.
Play Around
Instead of placing your subject in the middle, have a look through your viewfinder to see if there is some negative space to include to make your shot more interesting.
It can be as simple as adding more sky, earth, or water to the frame.
Or taking a step back to change the ratio of the positive and negative space.
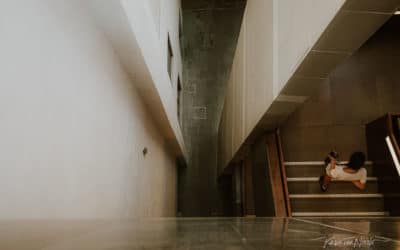
Adjust Your Point of View
When you see that your subject has a cluttered background, one of the easier things to do is to adjust your point of view.
Especially shooting up from a lower angle will decrease the clutter and create negative space.
Outside you’ll be shooting against the sky and inside for instance against the upper part of the wall which is usually empty or even the ceiling. And honestly, it’s simply a matter of dropping down on your knees!
But you can also shoot down from a higher angle.
In terms of execution, this usually involves a little more, but climbing on a little wall or a chair shouldn’t be too complicated.
In that case, the negative space will be comprised of, for instance, the pavement, the grass, or the floor.
Blur the Background
Another way to create negative space is to blur the background or foreground.
This involves a little more camera skills because you need to shoot with a very wide aperture to blur out areas of the frame.
Click here to learn how to create a Blurry Bokeh Background.
But when you know how to do this, it can be a very effective tool to create negative space.
The background needs to be a little similar, to begin with, or it won’t become negative space.
But you can use this to push your negative space composition a little further.
Click here if you wanna know how to create photos with depth.
During Post-Processing
When you’re editing your photos you can enhance the ratio between the positive and negative space by adjusting the crop.
The photo should already make use of the negative space photography tool.
If you want to emphasize the effect, you can play around with the crop and see which crop has the most impact.
Final Thoughts
As you can see, negative space photography is an essential composition technique. It is a simple way to make your photos look gorgeous and interesting because the world is full of negative space.
To train your eye, search for negative space elements without a camera in your day-to-day life. It’ll make it easier to notice it when you’re actually out shooting.
Now over to you! What do you think about using negative space in your photos? Share your thoughts in the comments below!
Did you try one of the tips? Share your photos on Instagram and mention @photography-playground!


0 Comments