
Natural Light Photography
Light is one of the key ingredients in a photograph. In this natural light photography tutorial, you’re going to learn how to make the most of the natural light that is so abundantly available to you. And to discover natural lighting is all about embracing the light.
Using natural light is exciting because you cannot control it. It is what it is. Yet another aspect you need to adapt to while working with what is presented to you as you so often do in travel photography.
It’s always changing just like life. And it teaches you to accept what is.
There’s no point being angry or annoyed at the sun because it’s shining too bright or not bright enough.
That doesn’t mean you become a passive photographer when it comes to shooting in natural light. You learn to make the light work for you and the story you want to tell. For natural light photos you need to mold the situation at hand to the best of your abilities so you can make the available light your helper.
To be able to do that you need patience and an open mind. You need to dance around the light, see how it is behaving and find the best angle. It’s all about being fully present in the moment.
I bet by now you’d love to know more about this elusive thing called light. We’ll dive into photography tips in a minute. First, let’s take a closer look at a very persistent myth about shooting natural light.
Bad Light Doesn’t Exist
One of the most persistent myths in photography is that there is such a thing as bad light. Let me spell it out for you.
There is no good or bad light. There’s only light.
Cold light, warm light, harsh light, soft light, foggy light, golden light, dappled light. I could go on for a while but I won’t.
The bottom line is this. A good photographer knows how to work in any light situation and make the light work for the shot.
Light is another tool to help you tell your story. It can either add or subtract from your story. But that doesn’t make it good or bad.
It is or isn’t in alignment with the story, mood or emotion you want to share.
For example, if you’re shooting a moody, gritty urban scene during the golden hour you will have a completely different photo then when you shoot in the harsh midday sunlight. And when it’s a foggy, rainy day it is an entirely different photo again.
None of these light conditions are good or bad in itself. They work with what you set out to tell or not.

Be a Student of Light
And that is precisely why you want to become a student of light. A perpetual student because the light is always different and you never stop learning.
To be a student of light you don’t need a lot, not even a camera. Just your eyes and the openness to become aware of the volatile and dynamic behavior of light.
It is ever-changing from season to season, from day to day, from hour to hour and even from minute to minute.
You’ll never be bored again once you’ve enrolled yourself in the school of light. Try it!
When you’re on your way to work, doing groceries, playing with the kids, traveling or whatever you’re doing in the outside world take a moment to look around and search for the light. Describe it for yourself (you’ll get the tools to do that in a minute) and make a mental snapshot of the light.
When you describe the light say something about the visual aspects, the stuff you can see. But don’t forget to open yourself up for the inner aspects as well. How does it make you feel and what kind of mood or emotion does it evoke?
You build up a mental light bank when you do this regularly. And you know what?
Having this light lexicon in your mind makes it so much easier to recognize light when you’re out shooting.
And more importantly, if it will add or subtract from your scene and story.
Cultivate Patience
As you know by now, natural light is always changing. Cultivating patience is always a good idea in photography.
When it comes to aspects like the moment it’s obvious that patience is a photographic virtue. But you know what?
Certain aspects of light are moment-driven as well and can change in a single second. It pays off to have the patience to wait for it sometimes.
It can be a slow and long-stretched moment in terms of changes during the day. The direction of the light and its accompanying shadows change dramatically in a day. And it might be worth your while to have a coffee and wait for an hour for the light to be right. Or to come back the next day and shoot in the early morning light because you can already see in your mind how that would totally make the shot.
A situation where the moment is short could be when there’s a cloudy sky. The difference between a mediocre and an amazing shot can be the beam of sunlight piercing through the clouds. That’s something you wait for. It might take a few seconds or a few minutes but you know it will happen and you know it will change the entire scene. So cultivate patience.
On the other side of the spectrum, I would like to encourage you to take advantage of the light immediately if it presents itself exactly as you want it to. This means getting into the ‘now’ mindset. No time for patience then. Just go for it!

Embrace the Light
Whatever the behavior of the light is you need to work with it. A natural light photographer cannot throw a sheet around the sun to make it shine a little less bright. It’s just not possible.
In general, it’s the extremes that will bring a beginning natural light photographer to tears. The harsh contrasty sunlight during midday or the flat light of an overcast sky.
But there is nothing else to do than to roll with it and adapt to the light.
Embrace it. Improvise, experiment, get creative and follow the light! Never let the light or the weather come between you and your camera.
When you need to embrace the fact there’s not a lot of light availabble to you check out this post on Low Light Photography!
Natural light takes on many different shapes and qualities. So let’s take a look at the different characteristics of light.
The Quality of the Light
The quality of the light describes the quality in terms of direct, hard light or diffused, soft light. And it depends largely on the weather conditions of the day.
Direct Light
On a bright sunny day, the light is direct and hard.
It creates deep dark shadows. The transition between highlights and shadows is abrupt and the contrast between lighter and darker areas is large.
Diffused Light
On a cloudy day, the light is diffused and soft.
It creates light shadows or no shadows at all. The transition between highlights and shadows is gradually and the contrast between lighter and darker areas is small.
How to Adapt
If the light is behaving exactly as you want it to congratulations! That’s awesome.
But there will be many occasions when it’s behaving like a rebellious child and does not cooperate with your plans for the day at all. You have 2 options basically. You can postpone your photography time but who wants to do that! So actually you have 1 option. You adapt.
In a situation when the light is direct and hard and you would like to do portrait photography, for instance, you can change locations.
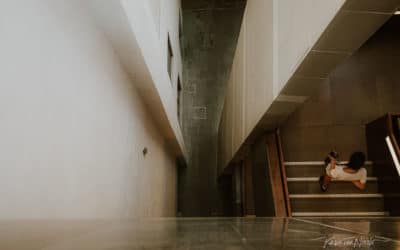
Open Shadow
Because you can find the soft diffused light that is so flattering for portraits on a bright sunny day. But you’ll have to look for it.
You know, wherever there is direct sunlight there are likely larger areas with shadow as well. We call it open shadow. Look for areas that have shade to evenly illuminate your subject and create a small contrast.
You can find these areas in the shadow of a building, or a doorway, under a tree, an umbrella, etc. You get the point!
There are also light situations that appear to be flat and perhaps even a little dull as is the case with the soft diffused light during an overcast day.
Roll With It
You look out of the window in the morning and the sky is like a grey blanket covering the world and therefore your scene. You check the weather forecast and it’s gonna be like this for a few days. Yikes!
This is especially disheartening when you’re traveling and you anticipated sunkissed landscape photography or contrasty urban shots.
This is another situation when you’ll have to adapt to the light. There’s not much you can do. Being patient is all fine when it’s for a few minutes or hours at most. But being patient and waiting for the light you hoped for would mean not photographing for a couple of days and that’s not gonna work.
What you can do is change your subject matter.
The soft light from an overcast sky is beautiful to make portraits for instance. Another solution is to go for natural light photography indoors. You can make use of the ambient light in a museum or church. Or shoot portraits using window light.
Another approach could be to compensate for the flat light by a great moment, a deep heartfelt emotion, a splash of color or an intricate detail.
Of course, you can also emphasize the feeling a grey day gives you and make a super moody photo.

The Direction of the Light
All light sources, direct or diffused have a place where they come from, the direction of the light. The more hard and direct the light is the more its direction shows in your photo.
When naming the direction of the light it’s always in relation to the subject and not you and the camera. Let’s take a look at the different types of light and how to work with them.
Front Light
Front light is when the subject faces the light.
It comes from the direction of the camera. It’s the light when the sun is behind you. It evenly illuminates the subject and there are no shadows complicating things. It’s an easy direction to work with because of that. But it can also become a little dull.
It can be good light to shoot portraits but when people look into the direction of the sun their facial expressions will change. So definitely watch out for squeezed eyes.
Front light can work especially well when the sun is almost down during the golden hour.
Top Light
The light coming from above is called toplight.
It’s the light the sun creates in the hours just before and after mid-day.
A lot of wannabe photographers will tell you to leave your camera at home at this time of day because it’s ‘bad’ light. Again, bad light does not exist. There’s only light that’s suitable for your scene and subject or light that’s not suitable.
They tell you to wait for sunrise or sunset and only make photos during those ‘golden hours’.
Can you imagine you wouldn’t be able to photograph from 11 AM till 3 PM! What a waste of photography joy that would be.
So, please, just go ahead and shoot when the sun is burning a hole in your skull (wearing a hat might be a good idea though!).
Side Light
Side light comes from either side of the subject.
It’s the light when the sun is on your left or right, in the morning or the afternoon. Side light will instantly give your subject a three-dimensional look because it creates shadows. It also emphasizes color and texture.
Exposing for side light can be a little tricky because of the large contrasts. Shooting in semi-auto or manual mode will be your best option so you can compensate for the large contrast.
Rule of thumb is to make sure your highlights are exposed properly.
Back Light
Back light comes from behind the subject.
It’s the light in front of you, facing the camera during the early morning and late afternoon. It creates large, long shadows in front of the subject and it can give a dramatic feel to an image.
It is the light you need to create silhouettes.
Exposing for back light is even trickier than for sidelight because the light meter in your camera will be confused by the huge amount of light streaming into your camera especially when the sun is in your frame.
This is also a situation when you need to take control and adjust your exposure. Again expose for the bright areas in your scene.
You can find more info about exposure compensation in tricky light situations in this post about sunset photography.
How to Adapt
Vital in working with the direction is the time of day in combination with your position and your subject’s position in relation to the sun. This is what I mean by dancing around the light. It’s how you make a difference.
You can change the way the light illuminates your subject by turning it.
By doing that you can change the direction of the light for instance from frontlight to sidelight or even backlight.
Of course, that’s not always possible. You cannot change the position of an entire building.
But you can change your own position in relation to the building and for instance turn backlight into sidelight by walking around and shoot from a different angle.

The Color of the Light
You probably don’t notice it yourself because you have an awesome color processing machine in your head working around the clock to ensure you see the world in its actual, neutral colors. But sunlight has different colors depending on the time of day and the weather conditions. We call it color temperature. The color temperature early in the morning is different from the color temperature during the day.
We describe color temperature as being warm, yellow light or cold, blue light. For instance, the color of the sun at midday is cold and blue and during sunset, it’s warm and yellow.
Our brains compensate for the different color temperatures during the day but your camera needs a little help to produce the actual, neutral colors. That’s why it has a white balance setting.
The Auto White Balance setting will usually do a good job in natural light.
It can have a bit of trouble in artificial light or when light sources are mixed. Since this is a tutorial about natural light photography I won’t get into that.
How to Adapt
During the day your camera’s Auto White Balance setting will be fine. As natural light photographers, that’s one less thing to worry about.
However, I do advise you to shoot in raw. Because shooting in raw will give you the option to fully adjust the color temperature in the editing phase. Something a Jpeg file cannot do for you.
Check out the post about raw versus Jpeg to find out more about shooting in raw.
Color temperature and white balance are wonderful tools to play with and underline the mood and emotion of a photo. Because who wants to see a sunset in neutral colors? Yep, no one ever did. Adding a little yellow and orange during editing in Lightroom makes a sunset more aligned with what we experience in real life.
Final Thoughts
While I was writing this post I was wondering if I have a favorite type of light like I have a favorite color.
But I don’t. I love light, in every color, shape or form it comes.
Of course, I can be exstatic when the light behaves exactly how it want it to. But if it doesn’t it’s a challenge to work with it and I love a challenge.
It also reminds me to go with the flow and accept what is. And that is a lesson we all need from time to time.
How about you? Let us know in the comments if you have a favorite type of light. Or a light situation you find really challenging.
Did you try one of the tips? Share your photos on Instagram and mention @photography-playground!


Inspiration that motivates vs daily life – I LOVE “Be a student of light.” It inspires me to keep observing light all the time THEN daily life starts pushing that inspiration aside. THIS TIME is going to be different. I’m putting notes around me to keep reminding myself. After about 2 weeks to a month, it should become second nature. THANK YOU, Karin, for the motivation. I appreciate you taking the time.
Hi Jenny, wow, that’s great to hear. Thank you!
I recently went on a cruise and throughout the duration of the cruise there was very little sun light, it was overcast very day,
I took a lot of photos and they all came out looking rather dull, I was very disappointed to say the least.
Then I received this email and the photos I took were pretty similar to the ones in the article. I read this article and was really inspired and did a bit of editing and what you, they all look fairly good now.
Thank you so much for the inspiration and now I have awoken to the fact that we just have to work with light that is presented to us and make the most of what we got.
Hi Hussain, I’m so glad you liked the article and have a different view of natural light now. That’s so great!